



A DIY Guide to Sprinkler System Installation
A sprinkler system installation can make lawn and landscape watering more consistent while saving you the time and effort of moving hoses and sprinklers around the yard.
With a good plan, the right materials, and careful installation, you can install a sprinkler system that delivers the right amount of water to each area of your property.
Table of Contents
Sprinkler Installation in 20 Steps
Installing an underground irrigation system takes more planning than simply digging trenches and connecting sprinkler heads. Before you start, you need to understand your water supply, plan your coverage, divide the yard into zones, install the piping and valves, connect the controller, and test the system.
Use the steps below to plan and complete a lawn sprinkler system installation from start to finish.
1: Review Your Sprinkler System Installation Checklist
Before you start digging, use this checklist to see the entire sprinkler system installation process at a glance.
Below, you will find a quick reference for the major stages of the project, while the steps that follow break down each part in greater detail so you can return to the information you need as you work.
- Check Local Requirements: Confirm permits, inspections, backflow requirements, and other applicable rules before beginning the installation.
- Map the Property: Draw the yard and identify structures, landscaping, hardscape, water sources, and other obstacles that affect the system layout.
- Measure Water Supply: Record your available water pressure and flow so you can determine how many sprinkler heads each zone can support.
- Plan Sprinkler Coverage: Position sprinkler heads to provide appropriate, consistent coverage while minimizing dry spots and overspray.
- Divide Into Zones: Group compatible sprinklers together and keep the total flow of each zone within the usable capacity of your water supply.
- Gather Materials: Purchase the pipe, fittings, valves, sprinklers, wire, controller components, and other supplies required for your planned system.
- Mark the Layout: Mark utility locations, pipe routes, valve locations, and sprinkler head positions before you begin excavation.
- Install the Water Connection: Connect the irrigation system to the water supply and install the required shutoff and backflow protection.
- Install Mainline and Valves: Run the main water line to the control valves and connect each valve to its designated irrigation zone.
- Install Lateral Lines: Set each sprinkler at the proper height and position, then connect and adjust the heads according to the planned coverage.
- Install Sprinkler Heads: Connect each valve to the controller using appropriate irrigation wire and protect the wiring from damage.
- Run Irrigation Wire: Connect each valve to the controller using appropriate irrigation wire and protect the wiring from damage.
- Install the Controller: Connect the zone wires, common wire, sensors, and power, then assign each controller station to the correct irrigation zone.
- Flush and Test: Run each zone to clear debris from the lines and check for leaks, pressure problems, wiring errors, and coverage issues.
- Backfill Carefully: Protect the installed pipe and wiring while filling the trenches, then restore the soil, sod, and landscaping.
- Program the System: Set watering schedules based on the needs of your lawn and landscape, along with local weather and watering restrictions.
- Maintain the System: Inspect, adjust, clean, and winterize the system as needed to keep it operating properly throughout the year.
2: Check Local Codes and Permits
Before you begin your sprinkler system installation, find out what your local government, water provider, or utility requires for connecting irrigation to your property.
Requirements can vary considerably from one location to another, so a setup that is acceptable in one city may require additional equipment, a permit, or an inspection somewhere else.
- Check Local Requirements: Contact your local water provider, building department, or plumbing authority before purchasing major components to find out whether your project requires a permit, inspection, licensed work, or other approvals. Ask specifically about underground irrigation systems rather than relying on general plumbing information.
- Confirm Backflow Requirements: Ask which type of backflow prevention device is required between your potable water supply and irrigation system. Depending on local regulations and the installation, requirements may involve a pressure vacuum breaker, reduced-pressure principle device, double-check assembly, or another approved method.
- Check Sensor Requirements: Some communities require irrigation systems to have rain sensors, weather-based controls, or other water-saving equipment. Even when a sensor is not mandatory, it can prevent scheduled watering after significant rainfall and reduce unnecessary water use.
- Follow Plumbing Codes: Make sure the connection between the irrigation system and your home’s water supply follows applicable plumbing requirements. This is especially important whenever you’re tapping into a main water line because an incorrect connection can create leaks, pressure problems, or a potential cross-connection with the household water supply.
- Plan for Inspection: If your jurisdiction requires an inspection or backflow test, find out when it needs to happen and what parts of the system must remain accessible. Do not bury or permanently cover components that an inspector needs to see before receiving approval.
3: Map Your Property
A good irrigation layout starts on paper before it ever reaches the ground. A property map gives you a way to work out sprinkler placement, pipe routes, zones, and potential obstacles without repeatedly changing the system after trenches have been dug.
- Draw the Property: Sketch the house, garage, lawn areas, planting beds, fences, sidewalks, driveways, patios, decks, and other permanent features. The drawing does not need to look professional, but it should be large and clear enough for you to mark measurements and sprinkler locations.
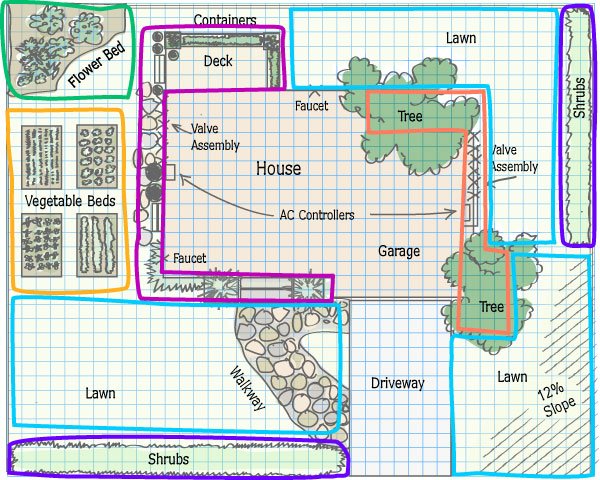
- Mark Water Sources: Identify the water meter, well, hose bibs (outdoor faucets), existing irrigation connections, or other potential connection points. Knowing where the water enters the property helps you determine the most practical route for the mainline.
- Mark Landscape Features: Identify trees, shrubs, garden beds, retaining walls, slopes, low areas, and other features that could affect sprinkler placement. A mature tree, for example, may block spray or make a proposed trench difficult to excavate.
- Measure the Yard: Record the approximate length and width of each irrigated area. Measuring a rectangular lawn is straightforward, but irregular areas can be divided into smaller shapes so you can estimate their dimensions and plan coverage more accurately.
- Mark Hardscape: Clearly identify sidewalks, driveways, patios, walls, and other surfaces that you do not want to cut open. If a pipe must cross one of these areas, planning the crossing in advance gives you time to determine whether boring, sleeving, or another installation method is appropriate.
- Identify Different Plant Areas: Separate turfgrass from flower beds, shrubs, trees, vegetable gardens, and other planted areas. These areas may need different sprinkler types, watering schedules, or zone configurations, even when they are next to one another.
4: Measure Water Pressure and Flow
Your home’s water supply puts a practical limit on the sprinkler system you can build. Measuring it before you design your zones helps prevent a common installation problem: having more sprinkler heads connected to a zone than the available water can operate effectively.
- Measure Static Pressure: Attach a pressure gauge to an outdoor faucet with no other water running and record the reading. This gives you a starting point for understanding the pressure available before water begins flowing through the irrigation system.
- Take Multiple Readings: Check the pressure at different times if your household supply varies throughout the day. Pressure can change because of municipal demand, a well system cycling on and off, or other water use on the property.
- Measure Available Flow: Determine how much water the supply can deliver over a known period using an appropriate flow-measuring method. A simple bucket test can provide a rough estimate for some installations, while a flow meter or other measurement device can provide more precise information.
- Account for Water Use: Remember that the irrigation system may share the water supply with toilets, showers, washing machines, faucets, or other fixtures. A zone designed around the theoretical maximum flow of the property’s supply may not perform correctly when another fixture is using water.
- Allow a Safety Margin: Do not design every zone to operate at the absolute maximum capacity of your water supply. Leaving some usable capacity helps account for pressure loss through the meter, service line, backflow device, valves, pipe, fittings, and other components.
- Consider the Water Source: Municipal water and private wells have different design considerations. A well system may have a limited pump capacity, pressure tank, recovery rate, or pump-cycle requirements that affect how long and how many sprinkler zones can operate.
5: Plan Sprinkler Coverage
Sprinkler placement determines how evenly the finished system can water the landscape, so it is worth spending time on the layout before excavation begins. The goal is not simply to put a sprinkler wherever there is an open space; each head should work with the others to cover the intended area without wasting water on places that do not need it.
- Start with the Corners: Place appropriate sprinkler heads at the corners of rectangular or square lawn areas to establish the basic coverage pattern. Corner heads typically use a quarter-circle pattern so they water two directions along the edges rather than spraying across the entire lawn.
- Cover the Edges: Add heads along the edges where necessary to reach the perimeter of the lawn. Position them so the spray reaches the grass without unnecessarily watering a house, fence, sidewalk, driveway, or neighboring property.
- Fill the Middle: Larger lawns may require additional sprinklers between the corners and edges. If a large open area cannot be reached consistently by the perimeter heads, add interior heads rather than increasing the spray distance beyond what the sprinkler can reliably provide.
- Use Head-To-Head Coverage: When practical, plan the system so the spray from one sprinkler reaches the next sprinkler. This approach helps compensate for the fact that many sprinkler heads apply water less evenly at the outer edge of their pattern than they do closer to the head.
- Match the Pattern: Choose quarter-, half-, or full-circle patterns based on the location of each sprinkler. A head along a straight property edge may need a half-circle pattern, while a head in the middle of an open lawn may need a full-circle pattern.
- Avoid Overspray: Keep irrigation away from buildings, sidewalks, driveways, streets, fences, and other areas that do not need watering. Overspray can waste water, stain surfaces, contribute to slippery pavement, and send water toward places where it can cause drainage problems.
- Consider Slopes: Pay attention to elevation changes when designing sprinkler coverage. Water can run downhill before the soil has time to absorb it, so sloped areas may benefit from shorter irrigation cycles with multiple start times rather than one long watering period.
6: Divide the Yard Into Irrigation Zones
A zone is a group of sprinkler heads that operates at the same time from a common control valve. Dividing a property into zones lets you work within the limits of your water supply while giving you more control over areas that have different sprinkler types, plant materials, sun exposure, soil conditions, or watering requirements.
- Group Compatible Sprinklers: Place sprinkler heads with similar operating requirements in the same zone whenever possible. A group of heads designed to operate at similar pressure and flow can generally be easier to balance than a mixture of very different sprinkler types.
- Separate Sprays and Rotors: Avoid combining sprinkler types with substantially different operating characteristics when doing so would make the irrigation zone difficult to balance. For example, a large rotor intended for a broad lawn area may require considerably different flow and pressure than a small spray head.
- Consider Plant Needs: Keep areas with different watering requirements in separate zones when practical. A sunny turf area may need a different schedule from a shaded planting bed, even if both areas are close enough to share the same water source.
- Calculate Zone Flow: Add the expected flow requirements of the sprinkler heads assigned to each zone. For example, if four heads each require 3 gallons per minute, that zone would require approximately 12 gallons per minute before accounting for system losses.
- Stay Within Water Capacity: Keep the total flow of each zone within the usable capacity of the water supply rather than its absolute maximum theoretical output. Pressure losses through pipe, fittings, valves, backflow equipment, and elevation changes can reduce the water available at the sprinkler heads.
- Plan One Valve Per Zone: Each independently controlled zone typically uses its own control valve. When the controller activates that valve, water flows through the corresponding zone while the other zones remain off.
- Leave Room for Expansion: Each independently controlled zone typically uses its own control valve. When the controller activates that valve, water flows through the corresponding zone while the other zones remain off.
7: Choose Sprinkler Heads and Components
Once you understand the property and water supply, you can begin selecting the components that will make up the system. The right equipment depends on the job each part needs to perform, so avoid choosing every component solely by size or price without considering how it fits into the overall design.
- Choose Spray Heads: Use spray sprinklers for smaller or more closely shaped areas where a relatively short spray radius can provide appropriate coverage. They can work well for narrow lawn strips, smaller residential turf areas, and other spaces where a long-throw rotor would be unnecessary.
- Choose Rotors: Use rotor sprinklers for larger areas where a longer throw and adjustable coverage pattern are appropriate. Rotors are commonly used on larger turf areas because they can cover greater distances while applying water more gradually than many conventional spray heads.
- Match Nozzles: Select nozzles based on the required radius, arc, flow, and spray pattern rather than simply choosing the largest available nozzle. For example, a corner head generally needs a different pattern from a head located along an edge, and both may require different output from a full-circle head.
- Choose Compatible Pipe: Select pipe and fittings designed for underground irrigation and suitable for the pressure and flow of your system. Pipe size also matters because undersized pipe can increase friction loss and reduce the pressure available at downstream sprinkler heads.
- Select Control Valves: Choose valves that are appropriate for the pipe size and expected flow of each zone. The valve should also be compatible with the controller and electrical configuration you plan to use.
- Choose a Controller: Select a controller with enough stations for every planned zone and consider adding capacity for future expansion. A system with six zones, for example, may be better served by a controller with additional unused stations than one with no room to grow.
- Include Backflow Protection: Install the backflow prevention equipment required by your local code and water authority. Backflow protection helps prevent irrigation water from flowing backward into the potable water supply under certain pressure conditions.
- Add a Rain Sensor: Consider a rain sensor or weather-based controller when appropriate for the property and local requirements. These devices can prevent scheduled irrigation when weather conditions indicate that watering is unnecessary.
8: Create Your Materials List
A detailed materials list turns the layout into a practical shopping list and gives you an opportunity to catch missing components before excavation starts. Count components by zone rather than estimating everything at once, because different parts of the property may require different sprinkler heads, fittings, pipe sizes, or connection methods.
- List the Pipe: Calculate the approximate amount of mainline and lateral pipe required based on the routes shown on your property map. Add some extra material for connections, adjustments, and unavoidable cutting waste rather than planning to use every foot with no allowance.
- Count the Valves: Match the number of control valves to the number of irrigation zones. If your design has five independently controlled zones, you will generally need five zone valves.
- Count the Sprinklers: List the number and type of sprinkler heads required for each zone. Record whether each location needs a spray head, rotor, corner pattern, edge pattern, full-circle pattern, or another configuration.
- List the Fittings: Include tees, elbows, couplings, adapters, risers, swing-joint components, valve fittings, end fittings, and other connections shown on your layout. Small fittings are easy to overlook and can bring an installation to a stop when you discover one is missing halfway through the project.
- Include Wire: Purchase enough irrigation wire to connect every valve to the controller, including the common wire and a separate station conductor for each valve. Leave additional wire at important connection points so future repairs can be made without having to splice in an entirely new run.
- Include Connection Materials: Plan for the appropriate primer, solvent cement, waterproof wire connectors, thread sealant, clamps, adapters, or other materials required by the specific pipe and components you are installing. Always follow the manufacturer’s instructions for compatible connection products.
- Gather Tools: Common installation tools include a shovel, trenching tools, pipe cutters, measuring tools, marking paint, flags, a pressure gauge, and basic hand tools. Larger installations may also require equipment for trenching, boring beneath hardscape, or handling large quantities of pipe and soil.
- Plan for Hardscape Crossings: Determine how you will get pipe underneath sidewalks, driveways, patios, or other obstacles before you begin digging. A simple residential sidewalk may be manageable with a manual boring method, while larger or more difficult crossings may require specialized equipment.
9: Mark Utilities and Your Irrigation Layout
Once the design is complete, transfer it from your drawing to the actual property. Marking the system first lets you walk the proposed layout, spot conflicts, and make changes while the lines still exist only on paper and paint rather than underground.
- Contact 811: Contact 811 or the appropriate local utility-locating service before excavation to identify underground utility lines. The process and required notice period vary by location, so make the request early enough to receive the required markings before you begin digging.
- Wait for Markings: Do not start excavation simply because you have submitted a utility-locate request. Wait until the required utilities have been marked and make sure you understand what the markings represent before operating digging equipment.
- Mark Pipe Routes: Use marking paint, flags, or another visible method to show the planned mainline and lateral routes. A clear route makes trenching more efficient and gives you a final opportunity to identify unnecessary turns or difficult crossings.
- Mark Valve Locations: Clearly identify where each valve manifold or valve box will be installed. Place them somewhere that remains accessible after landscaping is restored rather than burying them underneath shrubs, structures, or other permanent features.
- Mark Sprinkler Locations: Place flags or paint marks where each sprinkler head will go. Stand back and inspect the layout from different angles to make sure the proposed heads are not blocked by fences, trees, walls, or other obstacles.
- Watch for Tree Roots: Avoid major roots whenever possible because cutting roots can damage trees and make trenching more difficult. If an irrigation route passes near an established tree, consider whether the pipe can be rerouted rather than cutting through significant roots.
- Plan Hardscape Crossings: Identify every location where pipe must pass beneath a sidewalk, driveway, or other hard surface. Planning these crossings before excavation helps you determine where conventional trenching will stop and where boring or another method will be needed.
10: Connect to the Water Supply
The connection between your irrigation system and the property’s water supply establishes the foundation for the entire system. Because this work involves the home’s water supply and may be regulated by local plumbing codes, follow the requirements identified during the planning stage rather than treating the connection like an ordinary outdoor faucet installation.
- Choose the Connection Point: Select a connection point that can provide the flow required by your irrigation design and complies with local requirements. A location near the water meter or another suitable point of connection may help reduce unnecessary length and pressure loss in the mainline.
- Install a Shutoff: Use a dedicated shutoff valve for the irrigation system when practical so you can isolate irrigation without turning off water to the entire house. This makes repairs and seasonal maintenance considerably easier.
- Install Backflow Protection: Install the required backflow prevention device in the location, orientation, and configuration specified by local requirements and the equipment manufacturer. The device may need to remain accessible for testing or inspection.
- Use Compatible Fittings: Make sure that fittings, adapters, valves, and other connection components are compatible with the pipe material, water pressure, and connection method being used. Mixing incompatible materials or using components that are not rated for the application can lead to leaks or premature failure.
- Provide Access: Keep shutoff valves, backflow devices, and other serviceable components accessible after the installation is complete. Avoid burying important components simply because doing so makes the finished landscape look cleaner.
- Check for Leaks: Slowly pressurize the connection and inspect every new joint for leaks before proceeding. Finding a leaking connection while the work is exposed is much easier than discovering it after the trench has been filled.
11: Install the Mainline
The mainline carries water from the point of connection to the irrigation valves and may supply multiple zones. Because every zone depends on this portion of the system, a problem in the mainline can affect the entire installation rather than just one section of the yard.
- Plan the Route: Follow the route established on your property map and keep the mainline as direct as practical. Fewer unnecessary turns can simplify installation and reduce the number of fittings and potential connection points.
- Dig to the Required Depth: Install the pipe at a depth appropriate for your climate, soil conditions, local requirements, and system design. Freezing conditions may require different installation practices from areas where the ground does not freeze deeply.
- Cut Pipe Squarely: Make clean, straight cuts so fittings can seat correctly and solvent-welded joints have the intended contact area. A crooked or rough cut can make assembly more difficult and contribute to a poor connection.
- Prepare PVC Connections: Remove burrs and debris from the pipe, then use the appropriate primer and solvent cement according to the product manufacturer’s instructions. Push the pipe fully into the fitting, use the required assembly technique, and allow the connection to cure for the specified time before pressurizing it.
- Allow Connections to Cure: Give solvent-welded joints sufficient curing time before putting the system under pressure. Temperature, humidity, pipe size, and the specific cement manufacturer’s instructions can affect the required curing period.
- Avoid Pipe Stress: Install the pipe without forcing it into position or putting unnecessary strain on fittings. If a pipe route does not line up naturally, make the appropriate adjustment with a fitting rather than relying on the pipe to hold itself in a stressed position.
- Protect the Mainline: Provide adequate depth and protection where the mainline passes beneath areas exposed to vehicles, foot traffic, tree roots, or other potential damage. Consider the finished grade rather than measuring depth only from the temporary surface created during excavation.
12: Install Valves and Valve Boxes
The control valves divide the irrigation system into independently operated zones, making them central to both system performance and future maintenance. Valve assemblies should be arranged logically and installed where you can reach them later without digging up the landscape.
- Build the Manifold: Arrange the valves so each one receives water from the mainline and supplies its assigned zone. A well-organized manifold makes it easier to identify where each zone begins and simplifies future valve replacement.
- Match Valve Size: Choose valves appropriate for the pipe size and flow requirements of the system. The valve should be able to handle the expected flow without becoming an unnecessary restriction in the zone.
- Install Valve Boxes: Place valve boxes over the valves so the components remain accessible after the system is buried. The box should provide enough room for the valve assembly and allow the lid to remain at or near the finished grade.
- Provide Working Room: Leave enough space inside the box to turn fittings, disconnect wires, remove valves, and perform repairs. A valve box that barely fits the original installation can become a frustrating maintenance problem later.
- Keep Boxes Accessible: Position valve boxes where you can reach them without removing established plants or damaging other landscaping. Avoid locations where soil, mulch, roots, or other materials are likely to continually obstruct access.
- Label the Zones: Identify which part of the property each valve controls and record that information near the valve box or in your system documentation. For example, you might label zones as “Front Lawn,” “Back Lawn,” “Side Bed,” and “Garden Beds.”
13: Dig Trenches and Install Lateral Lines
Lateral lines carry water from each control valve to the individual sprinkler heads within that zone. This is where the installation becomes especially physical, so efficient trench planning can save significant time while also reducing unnecessary damage to the lawn.
- Preserve the Sod: Remove grass and topsoil carefully when possible so you can use the material to restore the trench after the pipe is installed. Keeping sod pieces together and setting them aside rather than mixing them into the excavated soil can make restoration easier.
- Dig Consistent Trenches: Make trenches wide enough to install and connect the pipe without excessive excavation. A trench that is unnecessarily wide creates more soil to remove and replace without providing a meaningful installation benefit.
- Use Appropriate Depth: Choose burial depth based on local requirements, climate, soil conditions, and the type of system being installed. The pipe should be protected from normal lawn activity and environmental conditions without assuming that one universal depth works for every property.
- Keep Pipe Supported: Lay the pipe so it rests securely in the trench without sharp bends, unsupported sections, or excessive stress. Remove rocks or other objects that could press against the pipe and create a weak point.
- Install Fittings Carefully: Use the appropriate fitting for every branch, turn, transition, and sprinkler connection. Dry-fit sections when necessary before permanently connecting them so you can confirm that the finished layout will align with the sprinkler locations.
- Cross Hardscape Carefully: Use an appropriate boring method to install pipe beneath sidewalks, driveways, or similar surfaces when possible. If you are boring manually, then confirm the route and depth before starting so that you do not accidentally emerge on the wrong side of the obstacle.
- Protect the Pipe: Inspect each trench before placing pipe and remove sharp rocks, broken concrete, roots, or other objects that could damage the material. Once the pipe is installed, avoid dropping heavy objects directly onto it before the trench is backfilled.
14: Install Sprinkler Heads
Sprinkler heads need to finish at the correct height and location relative to the finished landscape, not simply wherever the pipe happens to be closest. Small installation errors can affect spray coverage, create mowing hazards, or leave a head too low to operate correctly once the lawn grows back.
- Use Flexible Connections: Swing joints or other flexible connections allow sprinkler heads to be adjusted after installation and can help reduce damage from minor ground movement or contact with lawn equipment. They also make it easier to fine-tune the final position without cutting into the lateral line.
- Set Proper Height: Position each sprinkler so the top of the head sits at the appropriate finished grade. A head installed too high can become a mowing or foot-traffic hazard, while one installed too low can become buried by soil, grass, or thatch.
- Keep Heads Clear: Place sprinklers far enough from buildings, fences, sidewalks, and other hardscape to reduce unnecessary overspray. The exact offset depends on the sprinkler’s spray pattern and the shape of the area being watered.
- Align the Sprinkler: Position adjustable bodies and nozzles so their spray pattern matches the planned coverage. For example, an edge head should generally direct water toward the lawn rather than allowing a large portion of its spray to fall outside the irrigated area.
- Avoid Obstructions: Check whether mature grass, shrubs, fences, walls, retaining structures, or other objects will block the spray. A sprinkler that looks correctly positioned on paper may need to be moved if an obstruction prevents the water from reaching its target.
- Protect Against Damage: Place heads where they are less likely to be struck by lawnmowers, vehicles, foot traffic, or other equipment. Heads near driveways and walkways deserve particular attention because they are more likely to be exposed to physical impact.
- Keep Connections Secure: Tighten threaded connections appropriately without over-tightening them. Excessive force can damage plastic threads or fittings and may create a leak that becomes apparent only after the system is pressurized.
15: Run the Irrigation Wire
The controller communicates with the individual valves through low-voltage irrigation wiring. Because the wire will usually be buried alongside the irrigation system, installing it carefully and leaving enough accessible wire at connection points can make future electrical troubleshooting much easier.
- Use Irrigation Wire: Choose multiconductor irrigation wire rated for direct burial or install the wiring inside appropriate protective conduit. Select the wire based on the number of valves, distance to the controller, installation conditions, and applicable manufacturer recommendations.
- Provide One Station Wire Per Valve: Run an individual control wire from the controller to each valve. A system with six independently controlled valves, for example, needs six individual station conductors in addition to the common connection.
- Use a Common Wire: Connect the common wire to every valve in the system so the controller can complete the electrical circuit when activating a station. The common wire is shared by the valves rather than using a separate common wire for each zone.
- Leave Extra Wire: Leave additional wire at the controller and valve locations so future repairs or reconnections can be made without replacing the entire wire run. A few extra feet at each important connection point can make a major difference when working in a cramped valve box.
- Protect Exposed Wire: Use conduit or another appropriate protective method wherever the wire is exposed or vulnerable to physical damage. Pay particular attention to areas near the controller, valve boxes, structures, and locations where the wire could be disturbed during future landscaping work.
- Use Waterproof Connectors: Make valve connections with waterproof connectors designed for underground irrigation applications. Ordinary wire nuts or other connectors that are not intended for wet underground environments can allow moisture into the connection and cause electrical problems.
- Avoid Household Wire: Do not substitute unsuitable wire such as ordinary doorbell wire simply because it looks similar. Irrigation wire is designed for the conditions and multi-station requirements of sprinkler systems.
16: Install the Controller and Sensors
The controller is the part of the system that turns irrigation zones on and off according to the schedule you program. It should be installed where you can easily access it for programming and troubleshooting, with enough capacity to operate the number of zones you have designed.
- Choose a Suitable Location: Install the controller in a location that is protected from weather when required and convenient to access. A garage, utility area, covered exterior location, or other approved location may work depending on the controller and local electrical requirements.
- Match Controller Stations: Make sure the controller has enough stations for every valve in the system. If your design includes eight zones, for example, an eight-station controller is the minimum capacity, while a controller with additional stations leaves room for future expansion.
- Connect Zone Wires: Attach each valve’s station wire to the corresponding controller terminal. Keep a written record of which station operates which part of the yard instead of relying on memory.
- Connect the Common Wire: Attach the common wire to the controller’s common terminal according to the controller manufacturer’s instructions. A poor common connection can prevent multiple valves from operating correctly even when the individual station wires are connected properly.
- Connect Sensors: Wire rain, freeze, soil-moisture, or other compatible sensors according to the manufacturer’s instructions. If a sensor is required by local rules, make sure the selected controller supports it and that the sensor is installed where it can accurately detect the conditions it is designed to measure.
- Protect the Electrical Connection: Follow applicable electrical requirements and the controller manufacturer’s instructions when connecting power. Do not make assumptions about wiring, grounding, or electrical protection simply because the controller is used for a low-voltage irrigation system.
- Label Each Station: Record which yard area corresponds to each controller station and keep the information with your system documentation. This makes it much easier to troubleshoot a zone later or change the watering schedule for one area without affecting the others.
17: Flush and Test the System
Testing should happen before the trenches are permanently restored because exposed components are much easier to repair or reposition. Running each zone separately gives you a chance to see how the system actually behaves under pressure instead of assuming the finished installation will perform exactly as it did on paper.
- Flush the Lines: Open each zone and allow water to flow through the piping before installing or finalizing the nozzles. Flushing helps remove dirt, PVC debris, and other construction material that could otherwise clog sprinkler components.
- Check Every Connection: Inspect valves, fittings, pipe joints, and sprinkler connections while the system is pressurized. Look for active leaks as well as small areas where water is collecting around a fitting or connection.
- Test Each Zone: Operate every irrigation zone separately and verify that the correct sprinkler heads turn on. If a head does not operate, check the controller station, wiring, valve, and water supply for that zone.
- Check Pressure: Watch for weak spray patterns, incomplete rotor rotation, reduced throw, or sprinkler heads that fail to pop up properly. These symptoms can indicate insufficient pressure, excessive zone flow, an undersized pipe, a partially closed valve, or another restriction.
- Check Coverage: Look for dry areas, excessive overlap, overspray, and water reaching unwanted surfaces. Walk the entire zone while it operates rather than checking only the area immediately around each sprinkler.
- Verify Valve Operation: Make sure each valve opens and closes correctly from the controller and that shutting one zone off does not cause another zone to operate unexpectedly. Incorrect wiring can cause valves to activate together or prevent a zone from operating at all.
- Correct Problems Now: Repair leaks, replace damaged fittings, reposition heads, change nozzles, correct wiring, and make other adjustments before final backfilling. It is far easier to correct an exposed connection than to excavate a finished lawn later.
18: Backfill the Trenches
Once the system has been tested and the components are working correctly, the trenches can be restored. Backfilling is more than simply pushing all the excavated soil back into the hole; the way you replace the soil affects how much the ground settles and how easily the lawn recovers.
- Protect the Pipe: Place soil around the pipe carefully so rocks, broken concrete, and other debris do not press directly against the irrigation line. This is particularly important when the excavated soil contains large stones or construction debris.
- Return Soil In Stages: Add excavated soil gradually rather than filling the entire trench in one step. This gives you a chance to make sure the pipe remains in position and helps distribute the soil more evenly.
- Avoid Excessive Compaction: Do not compact the soil more aggressively than necessary immediately after installation. The disturbed ground will settle naturally, and excessive compaction can create hard areas that are difficult for grass roots to penetrate.
- Restore the Surface: Replace preserved topsoil and sod after the trench has been filled. If the existing sod has dried out during the project, water it appropriately after replacement to encourage it to re-establish.
- Add Soil for Settlement: Leave enough soil to account for normal settling rather than finishing the trench exactly level with the surrounding surface on the first pass. A shallow depression may develop as loose excavated soil settles, requiring additional soil later.
- Restore Hardscape: Repair or replace any surface material removed during installation using an appropriate method for that material. Take particular care with areas such as concrete, pavers, landscaping stone, or other surfaces that may require a more specialized repair.
19: Adjust Sprinklers and Program The Controller
A sprinkler system can be completely installed and still require significant adjustment before it is ready for regular use. The final test should be treated as a tuning stage: observe how water actually lands on the landscape, then make small changes to improve coverage and reduce waste.
- Adjust Spray Patterns: Set each sprinkler’s arc and radius so water reaches the intended landscape without unnecessarily crossing property boundaries or spraying nearby structures. Many adjustable heads can be fine-tuned while operating so that you can see exactly where the water is landing.
- Fine-Tune Rotor Arcs: Adjust rotor start and stop points to match the shape of the area being watered. A rotor covering a rectangular lawn, for example, may need its arc adjusted so it does not repeatedly spray a driveway or sidewalk outside the turf.
- Check for Dry Spots: Run each zone long enough to identify areas receiving noticeably less water than surrounding areas. A dry spot may be caused by poor head placement, an obstructed spray pattern, insufficient radius, low pressure, or a nozzle that does not match the design.
- Correct Overspray: Reduce the spray radius, adjust the arc, change the nozzle, or reposition the sprinkler when water reaches sidewalks, driveways, buildings, streets, or other unwanted areas. Correcting overspray at the sprinkler is generally more effective than simply shortening the watering schedule.
- Set Watering Times: Program the irrigation controller according to the needs of the plants, local weather, soil conditions, and applicable watering restrictions. Avoid assuming that every zone should run for the same amount of time because different sprinkler types can apply water at different rates.
- Use Multiple Start Times When Appropriate: Shorter watering cycles with time between them can help reduce runoff on slopes, compacted soil, or areas with poor infiltration. For example, instead of applying a long uninterrupted cycle that causes water to run downhill, you may divide the watering into shorter cycles that allow water to soak in between applications.
- Adjust Seasonally: Change watering schedules as weather, plant needs, and seasonal conditions change. A schedule that makes sense during the hottest part of summer may provide too much water during cooler spring or fall conditions.
20: Maintain and Winterize the System
Installing the system is only the beginning of keeping it working properly. Sprinkler heads can become clogged or damaged, valves can develop problems, landscapes change, and watering needs fluctuate throughout the year, so regular inspection is part of responsible irrigation system ownership.
- Inspect Sprinkler Heads: Check heads regularly for damage, clogged nozzles, poor alignment, sinking, or reduced spray performance. A head that has been struck by a mower or shifted by settling soil may continue operating while quietly watering the wrong area.
- Clean Nozzles: Remove dirt and debris that interfere with the intended spray pattern. If a sprinkler produces an uneven stream or noticeably reduced radius, inspect the nozzle before assuming there is a larger system problem.
- Check for Leaks: Look for unusually wet areas, damaged pipe, leaking valves, or other signs of an underground leak. A consistently soggy patch of lawn can sometimes indicate a buried pipe or fitting problem rather than excessive rainfall or poor drainage.
- Inspect Valve Boxes: Keep valve boxes accessible and clear of soil, vegetation, and standing water when possible. If a valve needs to be repaired, you should be able to open the box and reach the components without first excavating the surrounding landscape.
- Monitor Watering: Watch the landscape for signs of overwatering, underwatering, runoff, or uneven coverage. Changes in plant growth, soil moisture, drainage, or landscaping can make an irrigation schedule that once worked less effective.
- Adjust the Schedule: Change controller settings as seasonal weather and landscape watering needs change. Local watering restrictions may also change during periods of drought or unusually high water demand, so check current requirements rather than relying on the same schedule year after year.
- Winterize In Cold Climates: If freezing temperatures are expected, follow an appropriate winterization procedure for your system. Depending on the system and local conditions, winterization may involve draining water or using compressed air to remove water from irrigation lines so that freezing water does not damage underground pipes, valves, or sprinkler components.
- Restart Carefully: Inspect the system before bringing it back into service after winterization. Pressurize it gradually, check for leaks, and run each zone individually so you can identify damage before beginning the regular watering schedule.
DIY Sprinkler System Installation: Put Your New Sprinkler System to Work
A successful sprinkler installation starts with planning rather than digging. By measuring your water supply, mapping the property, designing appropriate zones, installing the piping and valves correctly, and testing every part of the system before backfilling, you can build an irrigation system that waters your lawn and landscape more consistently.
For additional irrigation installation supplies, tools, sprinkler heads, valves, pipe, fittings, controllers, and other components, Sprinkler Warehouse can be part of your planning and installation process. The most important step is to choose components that match your system’s water pressure, flow, layout, and local requirements rather than simply installing the same equipment throughout the property.
FAQs for Sprinkler Installation
Can I install a sprinkler system myself?
Yes. A homeowner can install a sprinkler system as a DIY project if they are comfortable planning the layout, digging trenches, connecting pipe, installing valves and sprinkler heads, and wiring the controller. More complex plumbing connections, electrical work, or installations subject to local permitting requirements may require professional help.
How deep does a sprinkler line need to be in the ground?
Sprinkler lines are commonly buried about 6 to 12 inches deep, but the appropriate depth depends on your climate, soil conditions, local requirements, and the part of the system being installed. In areas with freezing temperatures, irrigation lines may need to be installed deeper or properly winterized to protect them from freezing.
Do you need a permit to install a lawn sprinkler system?
It depends on where you live and how the system connects to your water supply. Check with your local building department, water provider, or plumbing authority before installation to determine whether a permit, inspection, backflow test, or other approval is required.
Should I use 1/2 or 3/4 pipe for a sprinkler system?
The right pipe size depends on the zone’s flow requirements, pipe length, water pressure, and the number and type of sprinkler heads. Smaller pipe may work for low-flow sections, while larger pipe can reduce friction loss and help maintain adequate pressure over longer runs or higher-flow zones.
Is it worth it to install a sprinkler system?
A sprinkler system can be worthwhile if you want more consistent watering, less manual work, and better control over how and when your landscape is irrigated. The value depends on factors such as the size of the property, installation cost, local water rates, and how much time you would otherwise spend watering by hand.
If you want to stay up-to-date on the latest Sprinkler Warehouse news and make the most of all of our one-of-a-kind promotions, join the IrriGator community today. Happy watering, IrriGators!