Calculating The Correct Pipe Size
This article explains how to determine what pipe size you need. If you already have some pipe, click here to learn how to determine what kind of pipe it is. It is important to use the appropriate size pipe for your flow rate. Using the correct size will help keep friction low which will help to reduce pressure loss.
Do not use a smaller pipe diameter than is recommended. Although, it is okay to use a larger pipe diameter. In certain instances sizing up can help to compensate for low pressure and or for very long pipe runs.
PVC stands for polyvinyl chloride. PVC is easier to say. This type of pipe accounts for about two thirds of the water distribution market, including drinking, irrigation, and waste. So far the material has been found to be inert, meaning it doesn’t absorb or release harmful chemicals. Unless you burn it. Don’t sniff burning PVC. It’s no fun, painful and the smoke can be hazardous.
The most common question we get is a two-parter: what size pipe should I use and what kind: Schedule 40 or Class 200? Knowing the differences can help you create an efficient system.

Schedule 40 Pipe:
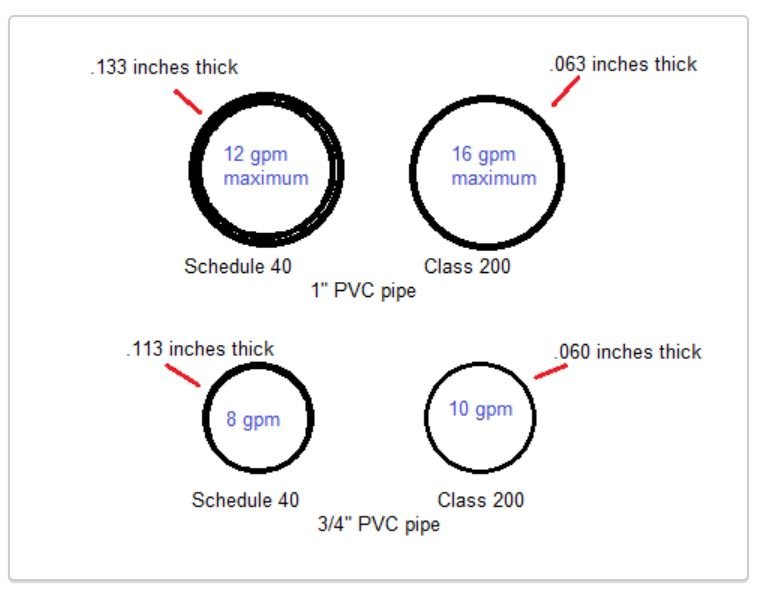
Let’s talk about Schedule 40 pipe first. It is the simplest. Schedule XX designates the wall thickness at a certain size. For example, a 1” pipe in schedule 40 has a wall thickness of .133”; schedule 80 has a wall thickness of .179”. Higher schedule = thicker wall.
“Class” Pipe:
“Class” pipe is different and the original definitions go back to steam boilers. We’ll skip ahead. Class 200 pipe, the most common class pipe used in irrigation, is rated for 200 pounds per square inch pressure (psi) and has a wall thickness of .063” for a 1” pipe. Notice that is a lot thinner than schedule 40. This is about to become very important. Schedule 40, in comparison, is rated for 450 psi. This is not as important.
Irrigation System Design:
The average irrigation system is designed for about 30 to 50 psi. Plenty of safety factor built in. It is not, however, as much as you think. A poorly designed system can experience water hammer and a 60psi line can experience frequent surges of pressure up to about 170 psi. Still within safety range.
Now we can get into the “why do we care” part. Everything in irrigation ties into gallons per minute. Your spray head puts out a certain number of gallons per minute (gpm). Your design revolves around it. If you have 13 gpm you can put six 2 gpm heads on that zone. Or four 2gpm and four 1 gpm. (Never design to the absolute max gpm.)
Look at the cross section of ¾” and 1” pipe both in schedule 40 and class 200. Check the comparative flows in the picture above. This difference in flow can make a big difference in how you design your zones.
Which Do You Choose?
The rule of thumb is to use schedule 40 for the main line. Run it from the water meter, through the backflow and to the valves. Then use class 200 for the laterals, or after the valves.
Why schedule 40 when it allows fewer gallons per minute?
Because the thick wall makes it tougher, harder to break. Your main is under constant pressure; the laterals are under pressure only when they are active and it is an open-end system. Before real pressure can build in your laterals the water is shooting out the sprays, keeping pressure down. Schedule 40 is more resistant to shovels (its sworn enemy), tent stakes, car tires, kids, dogs and other puncture/crack pressures.
There are exceptions to everything. There are situations where an entire system should be done in class 200 pipes. Same for schedule 40.

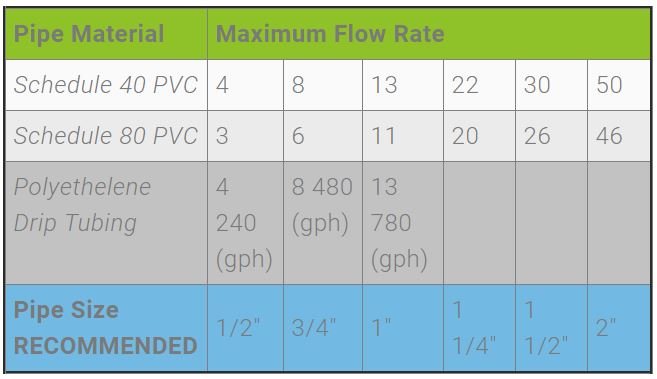
The chart above answers the question about how to determine what size you need. Begin by finding the pipe material you have chosen, as well as the flow rate that you have calculated. The bottom of the chart shows the results for the recommended pipe size.


