Maybe It’s An Electrical Problem
This article discusses how to use a multimeter to determine if you have a bad controller, valve, or wiring problem. Multimeters are handy for testing many kinds of wiring or electrical problems. Considering their versatility they are amazingly affordable. While they vary in complexity from basic to how-many-functions-did-you-say-it-had levels, we only need the basic here. Shop all multi-meter & electrical supplies at the Sprinkler Warehouse
The most important thing to know if you have never read one: read the instructions. Two or three times. Make sure you understand the symbols and connections. There are few things as interesting as trying to test a 110AC wall outlet when your meter is set for low voltage DC. You’ll know you messed up.
Sprinkler Valve Won’t Come On
Your valve won’t come on and we don’t know why. There are really three electrical reasons it might not: bad controller, bad wires, bad solenoid. We always start with the simplest test first.
When testing to see whether our problem is with the controller the question we are really asking is “does the controller put power out to the valve?” To check this we’ll simply test two connections inside the controller. So open your controller so that you can see where the valve wires connect. You should have one COMMON, usually white, and any number of zones, usually red but any color is possible.
Turn your Multimeter to the proper VAC setting. Turn the problem zone on with the manual start on the controller. Here we will say it is zone 1. Touch one lead to the common and one lead to the zone 1 wire/screw. You should get around 24V. Usually 22 to 28 works. If you get lower than 22 you have a problem. Check another zone even though the other zones are working properly. It only takes a second and verifies that the Multimeter is set and functioning correctly.
Testing The OHMS or Resistance Of The Zone
Let’s assume the voltage is good. Now let’s check the wires. We’ll check for continuity, which is testing the ohms or resistance of the zone. Turn to the Ohms setting. It might look like (Ω). Check your manual to be sure. This will test for a short in the circuit. First, turn off the controller. You don’t want to check the resistance with a live circuit. Disconnect the zone wire. Place one lead on the common terminal and one lead on the zone wire/screw. Depending on the valve brand you should get a reading from 20-60 ohms; every manufacturer’s valves will have a slightly different reading. Low signals indicate trouble with the solenoid. On the other hand, any reading above 60 means you have a wiring problem, either stripped insulation, nicked wire, or a bad connection. Wire problems can be involved so, before we get the shovel out, let’s go test the solenoid and other wire ends. Before you start walking, manually turn the zone on again.
Disconnect The Wires From The Valve
At the valve disconnect the wires from the valve. Now set your multimeter back to the proper VAC setting. Touch one lead to the common and one to the power. You should get the same reading here (24v) as you did at the controller. If you continuity test you did in the last paragraph failed you probably won’t. We are double-checking the wire to make sure of problems before we tell you to start digging.
If all that passes we are left with two things: either the twist connection for the controller wire to the valve was bad or the solenoid is bad. Let’s test the solenoid first. Go back to your Ohms setting. Touch one lead to one wire from the solenoid, and the other lead to the other. Again, you should get between 20 and 60 ohms. If not, replace the solenoid. If it passes the only thing left is a bad connection. Re-connect the wires using waterproof connectors, and see if it now activates. Remember that the controller has that zone on so 24V should be going through those wires. Careful. Might want to turn the zone off then reconnect and test.
If you have not found the problem at this time there may be a mechanical problem in the valve. You can replace the valve but first, just open it and clean the internals.
We tested the controller for output, the wire for continuity, the connections for, well, connection, and the solenoid for resistance. All with the handy-dandy Multimeter.
About The Pro 48
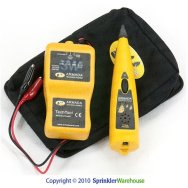
If you plan on doing this on a regular basis, consider the Pro 48. The Pro48 TechTool incorporates a solenoid activator to hold valves open; a chatterer to locate lost valves; a continuity checker to identify cut or shorted wires or solenoids; and a 24 VAC detector to ensure proper clock power output. Operation is simple as LEDs indicate tests and conditions. Truly a workhorse product for any landscape professional. This, along with a valve locator, can be purchased or rented at Sprinkler Warehouse.


