Repairing Water Hammer
This article discusses both the diagnosis of and how to fix water hammer. It also discusses the difference between water hammer and air in the pipes.
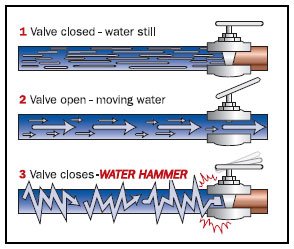
Air in the pipes is often confused with water hammer. For that reason, it is important that you locate the problem before you start trying to fix the noise. Noises in pipes can originate from many different causes including, water hammer, air in the pipes, undersized water meters and changing water temperatures. Another common cause is water pressure higher than 60 PSI.
If the noise occurs when you open a valve or faucet, it is probably air in the pipes. However, if it occurs when a valve closes it is probably water hammer. Although, if it happens when a pump starts, it could be air in the pipes and/or water hammer.
Signs Of Water Hammer:
- If the noise occurs when a valve closes
- Noise when the pump starts
- If you hear quick repeated bumps or a loud thump followed by silence
Signs Of Air In The Pipes:
- Noise unrelated to a valve opening or closing
- Noise when a pump starts
- Vibrating or prolonged noises

Fixing Water Hammer:
The easiest method to fix water hammer is to lower the water pressure for your entire irrigation system. It will not get rid of all of the water hammer, but it will sometimes reduce water hammer to a level you can live with.
If you have an automatic system, you may be able to rid water hammer by simply changing the order in which the valves operate. In this case, find out which valve uses the least water. This will probably be the one with the least amount of sprinklers, but not always. Once you figure it out, rewire the controller so that the valve that uses the least water is the last valve to run.
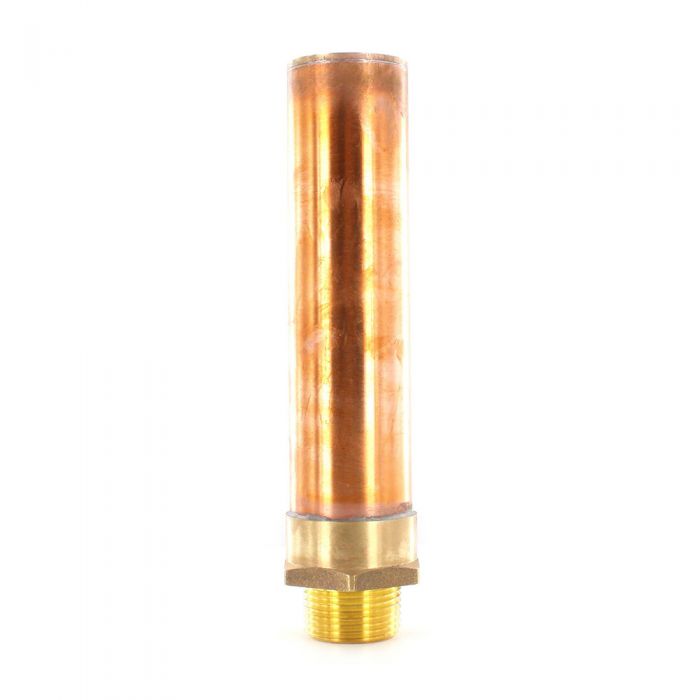
Water Hammer Arrestor
This model is the Wilkins 1260XL water hammer arrestor in 1 in. It is used to reduce banging in the pipes that you hear from water hammer. It is made of brass and copper for long-lasting durability.
Shop Water Hammer Arrestors
Find high-quality water hammer arrestors at SprinklerWarehouse.com. When you are ready to install a water hammer arrestor you can check back here for more tutorials to help your installation go smoothly. Installing a water hammer arrestor can also help to protect against damage and prevent erosion.
Try a water hammer arrestor. This mostly only fixes water hammer caused by washing machines and dishwashers. But it is worth a try with a sprinkler-related water hammer. Install it per the instructions on the package and try putting it on a hose bib to the point where the irrigation system connects to the house water. If you have a hose bib on the irrigation system mainline, that is an even better place. Or you can tap into the irrigation mainline to install it. If it does not work, remove it and return it to the store where you purchased it.

Try Reducing Pressure
If the valve is one size smaller than the pipe then there is a chance that the valve is the problem. Cheaper valves often snap closed faster than more costly ones. It might be a good idea to replace the valve.
Splitting valve zones is another good way to rid water hammers. If only one of the irrigation valves is causing a water hammer, the easiest solution is to reduce the amount of water that the valve is using. That will reduce the velocity and the water hammer should stop. You then need to reduce the number of sprinkler heads the valve operates. The easiest way to do that is to install a second valve and connect half the sprinklers to it.
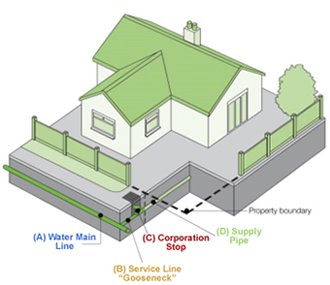
Check all of the pipes that your water passes through on the way from the water main to the valves to see if there is a “bottleneck” – a section of pipe that is smaller than the others. You will need to check the gooseneck, the house water supply pipe, and the irrigation mainline. As soon as you find one that is smaller than the rest, replace that with a larger pipe.
To determine the size of the pipe, grab a piece of string about 6″ long. Measure how many inches of string it takes to go around the pipe once. The string length is the circumference of the pipe. Using the circumference you can find your pipe size below:
| For Copper and PEX Tube and Pipe | |
|---|---|
| Circumference | Pipe Size |
| 2.75″ | 3/4″ pipe |
| 3.53″ | 1″ pipe |
| 4.32″ | 1 1/4″ pipe |
| 5.10″ | 1 1/2″ pipe |
| For Steel Pipe or PVC Plastic Pipe | |
|---|---|
| Circumference | Pipe Size |
| 3.25″ | 3/4″ pipe |
| 4.00″ | 1″ pipe |
| 5.00″ | 1 1/4″ pipe |
| 6.00″ | 1 1/2″ pipe |
| For Flexible Polyethylene Pipe | |
|---|---|
| Circumference | Pipe Size |
| 2.96-3.33″ | 3/4″ pipe |
| 3.74-4.24″ | 1″ pipe |
| 4.90-5.57″ | 1 1/4″ pipe |
| 5.70-6.28″ | 1 1/2″ pipe |
Fixing Air in Pipes
There are two methods for removing air from pipes is to release the air by opening the pipe or increase the water speed and force the air out.
Method 1
- Use The flow control handle to open and then close the valve.
- To force the air out you must increase the water velocity to the point so that it pushes out the air bubbles.
- To increase the velocity by creating a high water demand you can achieve this by turning on as many water outlets as possible.
- The resulted high velocity causes the water to rush through the pipes forcing the trapped air out of the pipe.
- Remove the air you need to manually open two or more of the circuit valves at once.
- Run the water for a while in order to force all of the air out.
- Make sure to close the valves one at a time.
- A pressure surge can be caused if you close them at the same time and the surge could damage your irrigation system.
Method 2
- In order to increase the water velocity in a lateral pipe, you must remove some of the sprinklers from the valve circuit.
- Locate and remove the three sprinkler heads that are the furthest from the circuit valve.
- Once they are removed open the valve and flush out the air.
- If that does not solve it, try removing more sprinkler heads.
- As a result, the air is flushed output the sprinkler heads back on.
If your problem persists after the next cycle your sprinkler heads could be at different heights causing the water to drain out of the pipes through the sprinkler heads which causes air to get into the pipes.
As a result, you need to install check valves at the inlets of your sprinklers. The check valves do not affect your sprinklers it pushes the water back so it does not drain out. So, a lot of manufacturers are making sprinklers with check valves built-in.

Household Pipes
- To remove the air, turn on all your faucets and flush all of your toilets.
- Wait a few minutes to allow the air to move out.
- Turn off the faucets one at a time, starting with the one closest to the location your water supply enters your house.
- Flush it again and wait two additional minutes before you close another faucet.


