Benefits of a Battery Operated Timer
Move over Hunter Node, Rain Bird has a battery-operated solution that’s a game-changer. I’m Adrian Sanchez here, for Sprinkler Warehouse. Let’s talk about the Rain Bird ESP 9-volt battery-operated timer.
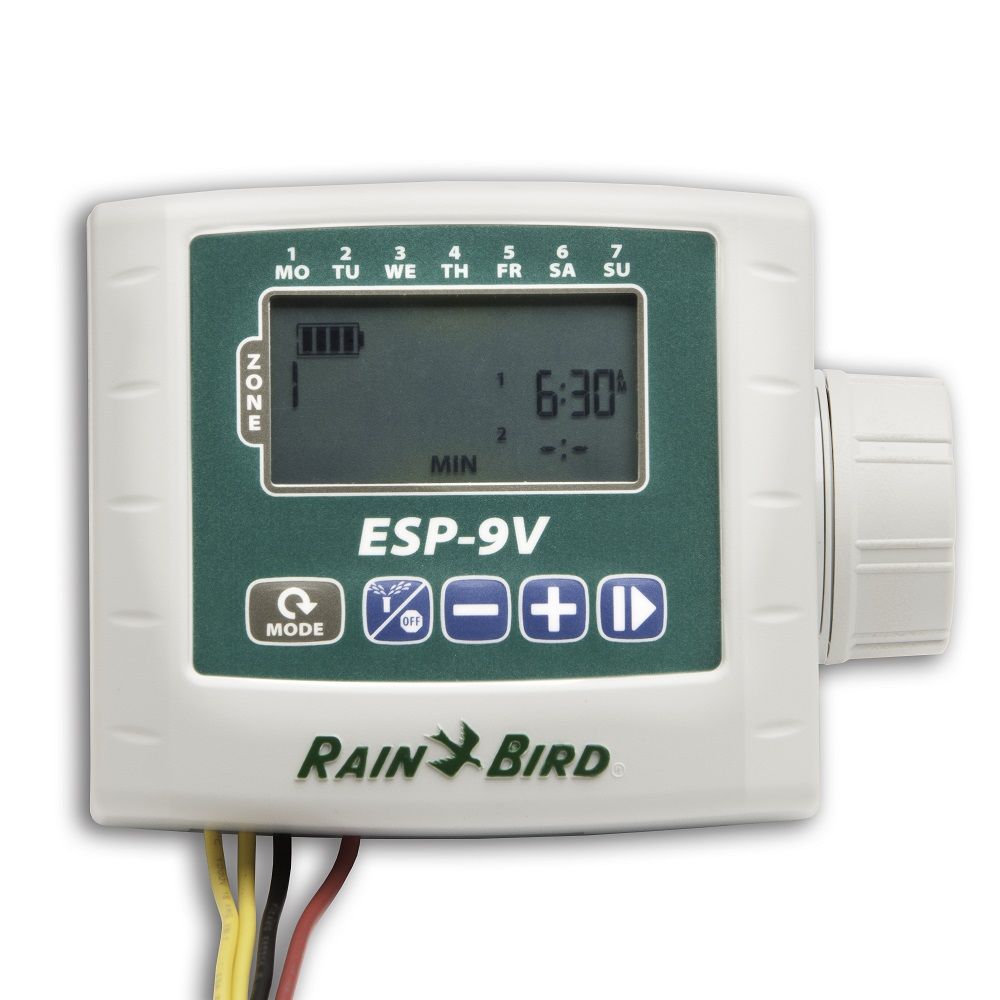
This series of high-quality controllers come in one, two, four, and six station versions. In the model, the number following the “V” indicates how many zones are possible. For example, this is the ESP-9V6, it has up to 6 possible zones.
The ESP-9V6 Battery Operated Timer Supports up to 6 Zones
This battery-powered sprinkler timer can be used to operate from one to six zones, depending on the model. Note, that you need to have a DC latching solenoid on your valve to use a battery-powered controller. If your valve doesn’t have a DC latching solenoid, you can retrofit the valve with one. However, we highly recommend purchasing one that is made for your valve.
You can insert the battery-operated timer in the valve box even if your box is muddy and flooded. Yes, you read that right, this high-quality timer is suitable even underwater. It also comes with a mount that is supported on top of a Rain Bird DC latching solenoid.
Installing The Batteries In Your Irrigation Controller
This Rainbird ESP-9V controller operates on either one or two alkaline nine-volt batteries. One battery should last one year and two batteries should last about two years. To install the batteries first, unscrew the cap and then, pull out the connectors. Next, attach the batteries and slide them back in and screw the cap back on.
The yellow wire that is attached below the controller is the rain sensor. To install a rain sensor, you will need to cut the wire. Remember to use waterproof wire nuts when wiring your rain sensor to avoid any risks. The 2.25” LCD display makes the device easy to navigate and user-friendly.
How To Set Up The Date And Time In Your Controller
Let’s start with programming the date and time on your ESP-9V battery-operated controller. First, set up the date by pressing the mode button until the last two digits of the year begin flashing. Use the plus or minus keys to adjust the correct year. Next, press the arrow button to set the appropriate month. Lastly, use the same method to program the day of the month.
If you made a mistake anywhere along the way, use the arrow key to circle back to the year, month, and date so you can make corrections as needed. Hit the mode button again and let’s set the time.
To begin setting the time, use the plus or minus buttons to select the appropriate hour. Notice the AM/PM flashing beside the minutes. Scroll through the hours to indicate either AM or PM. Next, use the arrow button to begin setting minutes. Lastly, hit the mode button once you’ve programmed the time correctly.
Using The Rapid Programming Feature
The contractor rapid programming feature allows you to program the first zone. Then, those settings will automatically be applied throughout the remaining zones and by default, they will each start in sequence. However, changes made to a zone afterward will only affect that zone. The number on the left side of the screen indicates which zone is being programmed. Utilize the plus and minus keys to navigate through the zone you’re working in.
There are four available start times for each zone in the sprinkler system. By pressing the arrow key, you can set the start time of the first zone. Then, use the plus or minus keys to advance or regress the time by increments of ten minutes. Use the arrow key to program the next zones’ start time.
After the start time has been programmed, the arrow key will advance to the next zone. To individually program the start time of a zone, press the arrow button until the number on the left is blinking. Then, press the plus button to advance to the next zone.
The standard way of operating is when each zone starts in sequence. Each zone will have the same start time listed in the program but will fire off in sequence. Learn how to set the days of the week in the next section.
Download the Rainbird ESP-9V Series Manual Here
Put Your Sprinkler System On A Schedule
The up arrow or triangle underneath the day of the week represents whether that day is set to water or not. For example, the arrow under Monday will flash to indicate whether it’s ready to be set to water or not. By selecting the plus button, it will set Monday to water and then, advance to Tuesday. Alternatively, pressing the minus button will set Monday not to water, and advance to Tuesday. Note: plus for ‘yes’ minus for ‘no’.
For instance, if you want to water on Tuesday, Thursday, and Saturday only, press the minus, plus, minus, plus, minus, plus, minus buttons. On the display, there would be an arrow under Tuesday, Thursday, and Saturday indicating those are scheduled watering days. If you make a mistake, press the arrow key until you circle back around to make any adjustments.
Different Zones For Different Days
Custom watering days aren’t the only feature the Rainbird ESP-9V offers. The ESP-9V allows you to customize watering zones on different days. Press the plus and minus keys at the same time until ‘cycle every’ is displayed on the screen. Notice the calendar icon which represents you are programming days. This will allow the controller to be programmed to water every so many days (from one to thirty). You can also schedule to water on odd or even calendar days by pressing the plus and minus keys simultaneously.
Another hidden feature in your irrigation controller is the ability to program the duration of watering in different zones. For example, you may have a zone that contains plants that need to be watered more or less often than your lawn. You can do this by pressing the mode key until the number flashing corresponds to the zone you’re working in. An hourglass icon will appear indicating that you are now programming the watering time in minutes. Then, press the mode key again so that the time (in minutes) is flashing. Use the plus and minus to set the length of watering time. Note: 240-minutes is the max time.
How To Make Seasonal Adjustments
As discussed previously, the hourglass shape indicates you are setting time in the length of minutes. Press the mode key again and a water drop icon will appear with a percentage to the right. This indicates that you are now in the seasonal adjustment program setting. This feature allows you to reduce or increase the amount of watering time by a percentage based on the current season.
Modifying the percentage will adjust the watering times across all of the zones at once. This allows you to save time without re-programming each zone individually when the seasons change.
How To Start The Watering System Manually
In order to initiate the water system manually, select the button to the right of the mode key, which is an icon of a sprinkler head with an off icon. Use the plus or minus buttons to select which zone you wish to manually water or you can select all zones. Use the arrow key to set how many minutes you wish to water.
When you press the minus button and see ‘sch’ (it is referring to the schedule), it will water each zone for its normal watering time. To stop any current watering, use the off button to the right of the mode key. From the autorun screen, press the off button twice to stop any scheduled watering indefinitely.
To delay your watering schedule for a set number of days, press and hold the plus button until the screen changes. A sprinkler head with an “X” through it will appear and the number on the left represents how many days you wish to delay the schedule (this number can be set between one and nine days).
Sprinkler Warehouse Has Everything For Your Irrigation Needs
If you find yourself in a situation in which you are shopping for a battery-operated controller, I wouldn’t hesitate to recommend the Rainbird ESP-9V series to anyone. If you have questions about our products, chat with one of our incredible customer service agents on SprinklerWarehouse.com.
Remember Sprinkler Warehouse has everything for your irrigation needs so your trees, lawn, flowerbeds, and gardens are lush and beautiful. Subscribe to our YouTube channel for helpful tips tutorials and general sprinkler instruction. For Sprinkler Warehouse, I’m Adrian Sanchez your Sprinkler Warehouse Pro. Later irrigator.