Troubleshoot Irrigation Valve Issues
So one of your zones won’t come on, or won’t turn off. How do you figure out whether it is the valve, the controller, or your wiring? Adrian Sanchez here, for Sprinkler Warehouse. Let’s get started.
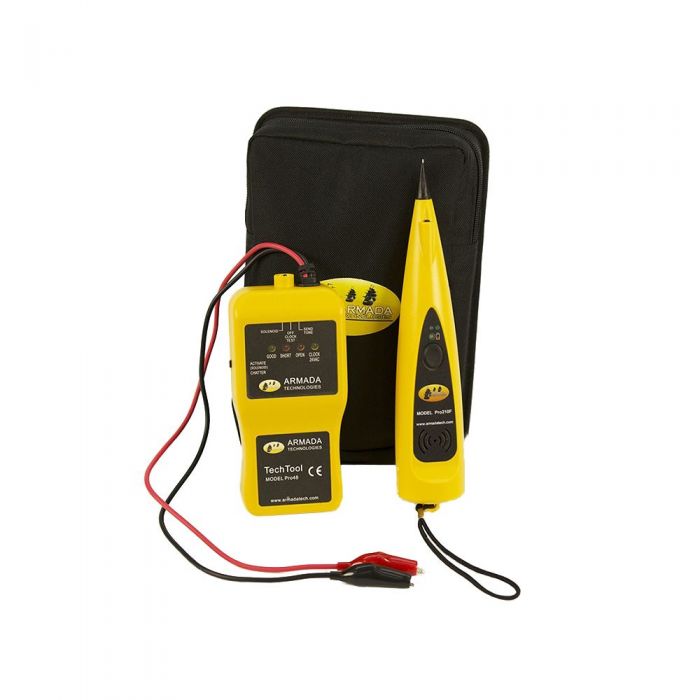
In order to properly troubleshoot your valve, controller, and wiring you need either a multimeter, also called a voltmeter or a Pro48 that looks like this, by Armada.

If you’re not familiar with how to operate a voltmeter, I suggest you purchase or rent a Pro48 from SprinklerWarehouse.com. A Pro48 is a tester that’s specifically designed for irrigation and it makes this task much simpler. If you’re a homeowner, I’d recommend renting one. If you’re a professional irrigator, you should definitely keep one of these on your truck.
Let’s talk briefly about what happens when the controller activates a valve.
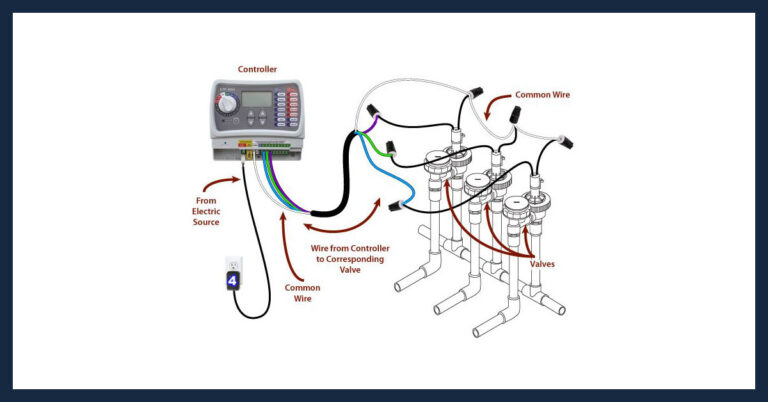
When it’s time to water, the controller sends around 24 volts of electricity through a lead wire to the solenoid on the valve. The solenoid also is connected to a common wire. The common wire is also connected to all the valves in your system and heads back to the controller, completing the circuit. The solenoid is made up of a coil of wire. When the coil is energized by the 24 volts of electricity, it creates a magnet that pulls a plunger up. The plunger allows the valve to open sending water to the sprinklers.
So let’s cover a few possible problems you may encounter.
Problem one: If a zone won’t stop running, it’s almost certainly a valve problem. That kind of issue is something that would practically never be caused by a controller. So in that case, find and replace the valve.
Problem two: When a particular zone turns on and one head doesn’t pop up, it’s probably a sprinkler head problem, start by replacing that head. If there’s more than one head NOT popping up, or perhaps none of them are, then your valve isn’t opening all the way. When this is the case, you’ll probably see some water dribbling from the top of some of the heads.
If your zone should not be on, and you’ve got water dribbling from the top of several heads or a few heads are popping up, then the VALVE for that zone is not closing all the way. Either way, you’ve got to replace that valve.
The most difficult problem to diagnose is that a zone won’t come on.
Problem three: A zone won’t come on. So this could be a problem with the power to the controller, the controller itself, the wiring between the controller and the valve, or the valve itself. Let’s start troubleshooting.
First, is your controller getting power? Is the LCD Screen on? If it’s not, you may not be getting power to your controller. Even if the LCD is on, it may be running on a backup battery, so it still may not be getting electricity. The GFI on your outlet may be flipped. Plug something electrical into the outlet to make sure it is working.
Is it the power supply? If your controller is an indoor/outdoor controller, it probably has a pigtail or chord coming from it that looks like this. But if you have an indoor controller it will often have a chord that looks something like this, with a brick on it. This is a transformer that transforms the 110 or 120 volts coming from the wall into the 24 volts that the controller needs. If you feel comfortable using a multimeter, you can test the power supply to see if it works and is delivering an appropriate amount of voltage to the controller.
If the problem is your power supply, it’s possible to replace just the power supply. Chat with one of our agents on Sprinkler Warehouse.com and they’ll help you determine if your power supply is available for purchase.
Is the controller working properly?
So, assuming your controller is getting power. Next, you’ll check to see if the controller is working properly. Set your controller to start watering the affected zone. If you’re using a multimeter, set it to a setting that will test for around 24 volts AC. You should get a reading of somewhere between 20 and 30 volts. If your reading is really low, the problem is your controller and it needs replacing.
To test using the Pro48, toggle the switch on top to the middle. That is the “clock test” setting. Black clip on common, Red clip on the zone you want to test. At the timer, make sure you manually turn on the zone you’re testing. On the Pro48 you should get a green light where it says “CLOCK 24VAC.” If it doesn’t light up, your controller needs to be replaced.
If your clock is working correctly, your problem is either your valve or the wires going to your valve.
Unscrew the common wire from your controller. And unscrew the lead from the affected zone. Using the Pro 48, turn the toggle to “Solenoid.” Connect the clips to the wires. It will light up either “good.” Or light up “short.” Or “open.” If it lights up “short,” or “open,” you have a problem with your wiring or with your solenoid.
If you’re using a voltmeter for this step, turn the meter to the lowest possible resistance setting. Wrap the wires around the voltmeter probes. Or touch it to the wires. The proper amount of resistance for a valve will depend on the brand and model of the valve but should fall somewhere between twenty to sixty ohms. A short, either in the wire or in the valve solenoid will show something close to zero.
A broken wire, an unconnected wire, or a malfunctioning solenoid will show “1” or “OL,” whatever the same thing it shows when your voltmeter probes are not touching anything. This model shows a “1”. The next step will have to happen at the valve. So, reattach the wires on your controller.
If you don’t know where your valve is, you can rent a valve locator from Sprinkler Warehouse.
Test if your valve is working properly.
To test the valve, you’ll need to have the wires on the solenoid unconnected to any other wiring. So unhook the wiring. Using the Pro48, set the toggle switch to “Solenoid.” Put the clips on the wires coming from your solenoid. It will read “short” or “open” or “good.” If it shows “short” or “open” replace the valve.
Or if you’re using the multimeter, set it to test resistance as we did earlier. Look for a reading between 20 to 60 ohms. On Sprinkler Warehouse dot com we have the technical specs for our valves. Most valve manufacturers make the resistance specs available. Or you can chat online with our customer service agents. They can find the specs for you.
If you’re not getting the proper reading somewhere between 20 to 60 ohms replace the valve. Technically, you could just replace the solenoid if the rest of the valve is good, but the difference between the cost of a solenoid and a valve is pretty small. So we highly recommend changing out the valve. Valves do eventually wear out, so why not get a brand new valve in there that should give you years of service before you have to touch it again.
If your valve tests are good, you probably have a wiring problem.
Set the controller to run on the zone you are testing. Back at the valve. If you’re using the Pro 48, flip the toggle switch to “clock test” and attach the clips to the wires. Doesn’t matter which is which. If the Pro48 shows “short” or “open,” then your problem is in your wiring.
To check the wires using the multimeter, set the multimeter to check for 24 volts VAC. Attach the wires to the probes on your multimeter and look for a reading of somewhere between 20 and 40 Volts. Once again, make sure the zone you’re testing is running. If you’re getting a reading of somewhere around zero, or you see a 1 or “OL” you have the problem is your wiring.
Your solutions for sprinkler wiring not working are:
Number one: See if there are any wire connectors that have come off, or see if there is a place where the wire has become corroded at a wire connector.
Number two: Run new wire. If you happen to have multistrand wire like this one coming into the valve and one of the strands in the multiwire is not being used, then boy are you lucky. Your new wire has already been run. Just swap out that wire to the valve and swap the wire at the controller.
Number three: Use a doubler. A doubler will allow you to operate two valves using only one lead wire. Chat with one of our sprinkler warehouse agents and they’ll tell you how to set it up.
Sprinkler Warehouse has everything for your irrigation needs.
So, your trees, lawn, flower beds, and gardens are lush and beautiful. And if you have any questions about our products chat with one of our superb customer service agents on Sprinkler Warehouse dot com. They really know their stuff and they will get you squared away. Subscribe to our YouTube channel for helpful tips, tutorials, and general sprinkler instruction. For Sprinkler Warehouse, I’m Adrian Sanchez. Later irrigator.


