Repairing a Broken Sprinkler Valve, Made Easy
Table of Contents
How to Repair a Broken Sprinkler Valve
This article explains how to fix a broken sprinkler valve. Just when you think that everything in your sprinkler system is working just perfectly, something will go wrong. Either you will wake up to discover that somehow one of your sprinklers has turned itself from a sprinkler into a geyser or a new pool exists where yesterday you had a valve box. Such is life. We fix them and move on. No need to stress.
I got a phone call the other night from my youngest brother who still lives at home. Since my middle brother and I moved away from home, he has been in charge of the sprinkler system. This is an important task because we did not use proper online instruction to install the system. We simply relied on the advice we got from the workers at the local sprinkler supply store and the hardware store.
And while the concept of installing a sprinkler system yourself seems simple, without the correct advice and instructions it is easy to make mistakes that you will regret for years to come. I wish that we would have looked online and found “Sprinkler School”. It would have given us all of the information and instruction that we needed.
So, for years now we have lived with the monster that we created. We need to start over and install a new system. Until then, we will continue to keep fixing and adjusting, and tweaking our Frankenstein system!
My brother had called me from his cell phone as he was standing out in the yard. He explained to me that there was something wrong with one of the valves and that it was not working. He wanted to know if I could tell him how to fix it or give him some ideas about what was causing the problem. My troubleshooting superpowers are diminished because he is in Idaho and I am in Texas. Something about that kind of distance impedes and messes with my ability to figure out what is making things not work and why.
The process to fix a broken valve is easy, and basically, anyone who can read this can fix one themselves.
So I told him that I would send him a new valve from our online store if he thought he could get by for a day or two till the part could get to him. Here are the directions I sent him. You can follow these steps to fix your own valve once you have a new replacement handy and ready to install.
How to Fix a Broken Sprinkler Valve:
- Shut off the water to the valve manifold or the area where you are working and remove standing water if possible.
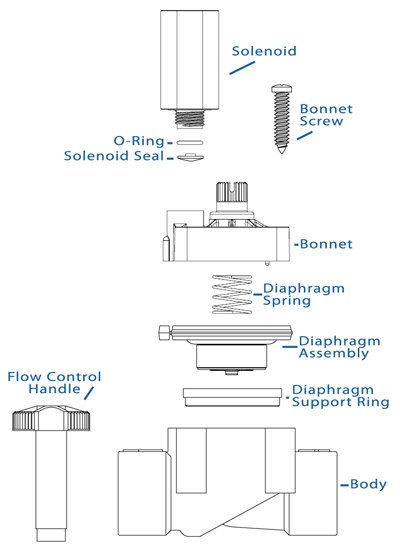
- Unscrew the solenoid and set it aside (be sure to keep it clean and out of any dirt or mud)
- Unscrew top of your valve (or unbolt the top) and remove it. Set it aside on a towel or a clean surface. Following the same procedure, open the top of the replacement valve you purchased.
- Remove the internal parts from the defective valve, paying attention to the order and placement of the pieces. Discard the old pieces.
- Replace the discarded pieces with those from the new valve. (You may choose to use the new top from the replacement valve or continue to use the original) Pay attention to the alignment holes!
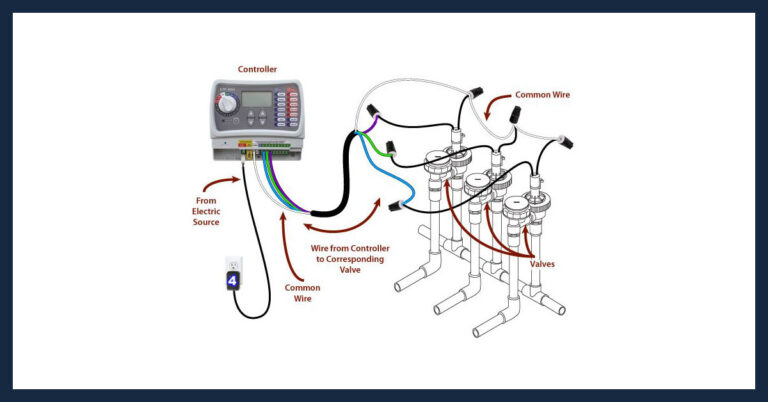
- Ensure the solenoid is wired correctly and matches the wiring of the other valves in the box (be sure to use grease or silicone filled wire nuts)
- Using the sprinkler controller activate the zone that corresponds with the valve you just repaired to confirm the repair was successful.
The housing for valves is durable and will continue to function as if it were a new valve. Or until it cracks or is otherwise physically broken. The bonus for this type of repair is that you will have a spare solenoid on hand for future use.


