


How to Install an Irrigation Master Valve
An irrigation master valve controls the flow of water into a sprinkler system. Installed near the main water supply, it opens when the irrigation controller starts a watering cycle and closes when the cycle ends to help prevent unwanted water flow when the system is not running and can limit water loss if a downstream valve or pipe develops a leak.
Installing a master valve requires some plumbing and electrical work, along with an understanding of how the irrigation system is laid out since the valve must be sized correctly, installed in the proper location, and wired to work with the irrigation controller.
Follow these eight steps to plan and complete an irrigation master valve installation.
Table of Contents
How to Install an Irrigation Master Valve in 8 Steps
Irrigation master valve installation involves connecting a compatible valve to the main irrigation supply line and integrating it with the sprinkler controller. The following steps cover the equipment, plumbing connections, wiring, and testing needed to install a master valve.
1: Locate the Main Irrigation Supply Line
First thing’s first. The master valve should be installed downstream of the water source and upstream of the individual zone valves. This placement allows it to control water entering the entire irrigation system rather than just one zone.
- Find the Mainline: Locate the main irrigation supply pipe where it enters the sprinkler system, typically near the backflow preventer or valve manifold.
- Choose the Installation Point: Identify an accessible section of pipe between the water source and zone valves. Leave enough clearance around the installation area to access the master valve for future inspections, maintenance, and repairs.
- Check the Pipe Layout: Make sure the selected location accommodates the valve body and required fittings without interfering with nearby plumbing or other irrigation components.
2: Gather the Necessary Tools and Materials
Identify the type and size of your main irrigation supply line and choose a compatible master valve. Having the right fittings and tools ready will help prevent installation delays and reduce the chance of leaks.
- Master Valve: Choose an irrigation valve designed for master valve applications, typically a normally closed, electrically operated valve. Check the manufacturer’s specifications for flow capacity, pressure range, connection size, and electrical requirements.
- Pipe and Fittings: Gather compatible PVC, polyethylene, or other pipe materials used by your existing irrigation system. You may need couplings, adapters, threaded fittings, and approved pipe cement or thread sealant, depending on the connections.
- Electrical Supplies: Get appropriately sized direct-burial irrigation wire, waterproof wire connectors, and any additional wiring needed to connect the valve to the controller. Check the valve manufacturer’s instructions for voltage and wiring requirements.
- Installation Tools: Prepare a pipe cutter or hacksaw, measuring tape, adjustable wrench, shovel, wire strippers, and other tools suited to your pipe material. Keep a bucket and towels nearby to manage residual water while working.
3: Choose the Right Master Valve
Not every irrigation valve is suitable for use as a master valve. Select a model that can handle the system’s operating pressure and flow while meeting the electrical requirements of your controller.
For most automatic sprinkler systems, a normally closed irrigation valve is the standard choice. Always check the manufacturer’s specifications and controller compatibility before purchasing.
| Valve Type | How It Works | Best Application |
| Normally Closed | Opens when electrically energized and closes when power is removed. | Standard automatic irrigation master valve installations. |
| Normally Open | Remains open without power and closes when electrically energized. | Specialized systems requiring different control arrangements. |
| Globe Valve | Uses an internal diaphragm or similar mechanism to regulate water flow. | Common residential and commercial irrigation systems. |
| Angle Valve | Directs water through an angled body to accommodate the pipe layout. | Installations where plumbing direction or available space requires it. |
4: Shut Off the Water Supply
Turn off the main water supply feeding the irrigation system before cutting into the pipe. If the system has a dedicated shutoff valve, use it to isolate the irrigation line.
- Close the Shutoff Valve: Turn the supply valve to the fully closed position and make sure water can no longer enter the irrigation system. If there is no dedicated irrigation shutoff, arrange to shut off the appropriate upstream supply.
- Relieve Line Pressure: Open a downstream valve or irrigation zone briefly to release trapped water and pressure. Wait until the flow stops before cutting the main supply pipe.
- Confirm the Line Is Safe: Check the work area for remaining water pressure and allow the pipe to drain. Never cut into a pressurized irrigation line.
5: Cut the Mainline and Install the Valve
With the water supply off, identify the section of mainline where the master valve will go. Make sure the location allows enough clearance for the valve body, wiring connections, and future servicing.
- Measure the Installation Area: Measure the valve and required fittings, accounting for the insertion depth of each pipe connection. Leave enough room to remove the valve later without cutting into additional sections of pipe.
- Cut the Mainline: Use a pipe cutter or appropriate saw to make clean, straight cuts at the marked locations. Remove burrs and debris so the fittings can create secure, watertight connections.
- Install the Valve: Connect the valve between the upstream water supply and downstream irrigation mainline. Follow the flow-direction arrow printed on the valve body, and use compatible fittings and manufacturer-approved joining methods.
- Secure the Connections: Allow PVC cement or other joining materials to cure according to the manufacturer’s instructions before restoring water pressure. Avoid overtightening threaded connections, which can crack plastic valve bodies or fittings.
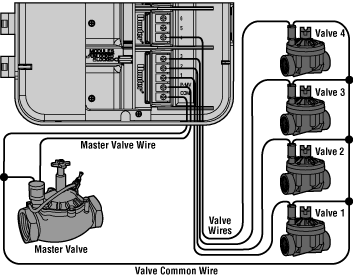
6: Connect the Master Valve to the Irrigation Controller
The master valve needs an electrical connection to the irrigation controller so it opens and closes automatically with the watering schedule. Most compatible controllers include a dedicated master valve or pump start terminal, often labeled M, MV, or P/MV.
- Identify the Controller Terminals: Locate the designated master valve terminal in the controller’s wiring compartment. Consult the controller manual to confirm which terminal controls the master valve.
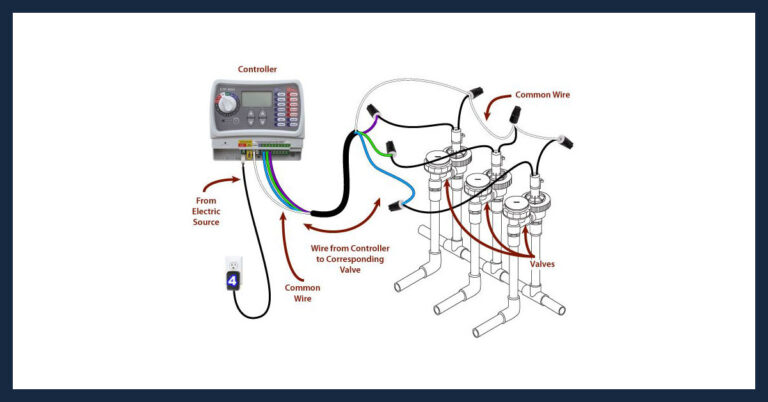
- Connect the Common Wire: Connect one solenoid lead to the controller’s common terminal or common wire, following the manufacturer’s wiring diagram. The common connection is shared with the zone valves in many standard irrigation systems.
- Connect the Master Valve Wire: Connect the second solenoid lead to the dedicated master valve terminal. Use a separate conductor from the zone valve wiring so the controller can operate the master valve independently.
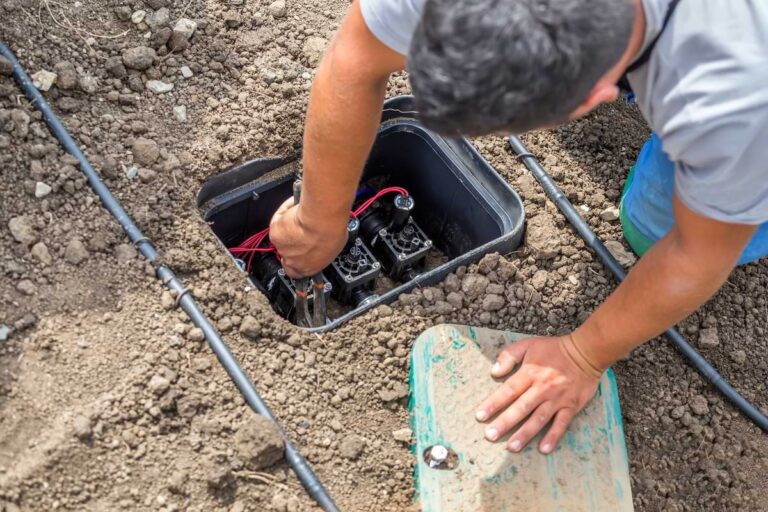
- Protect the Connections: Use waterproof connectors rated for direct-burial irrigation applications wherever wires are joined outdoors. Keep exposed copper and unprotected connections out of valve boxes and damp soil.
7: Restore Water and Check for Leaks
Once the plumbing connections have cured and the wiring is complete, slowly restore the water supply. Check the master valve and surrounding pipe connections before running a full irrigation cycle.
- Inspect the Valve Body: Look for leaks around threaded connections, unions, fittings, and the valve bonnet. Tighten or repair connections as needed, following the manufacturer’s recommendations.
- Check Water Flow: Run a watering zone and confirm that the master valve opens when the controller activates the system. When the zone finishes, verify that the master valve closes and stops the supply of water.
- Monitor System Pressure: Watch for unusual pressure drops, inconsistent sprinkler performance, or water hammer during operation. These symptoms may indicate an improperly sized valve, restricted flow, or an installation problem.
8: Test the Complete Irrigation System
The final step is making sure the master valve operates correctly with every irrigation zone. A successful installation should allow water to flow during scheduled watering and shut off the mainline when the controller finishes its cycle.
- Run Each Zone: Activate every irrigation zone through the controller and check that the master valve opens before or as the zone valve operates. Inspect sprinklers and drip irrigation outlets for consistent water delivery.
- Check Automatic Operation: Set a short test schedule and allow the controller to complete a full watering cycle. Confirm that the master valve closes after the cycle ends rather than remaining open.
- Inspect for Electrical Problems: Check for wiring faults, controller error messages, or a solenoid that fails to activate. Verify the wiring connections and electrical specifications if the valve does not respond consistently.
- Document the Installation: Record the valve manufacturer, model, size, and installation location for future reference. This information will make troubleshooting and replacement easier if the valve develops problems.
Keep Your Irrigation Master Valve Working Properly
A properly installed irrigation master valve adds another layer of control to an automatic sprinkler system. By shutting off the main irrigation supply between watering cycles, it can help reduce water loss from leaks and faulty zone valves.
Choose a compatible valve, make secure plumbing and electrical connections, and test the entire system before putting it into regular operation. Periodic inspections will also help identify leaks, wiring problems, and valve wear before they affect irrigation performance.
FAQs for Irrigation Master Valve Installation
Where in an irrigation system should the master valve be installed?
An irrigation master valve should be installed on the main water supply line downstream of the backflow preventer and upstream of the individual zone valves. This placement allows it to control water flow to the entire irrigation system.
Do you need a master valve for irrigation?
An irrigation master valve is not required for every sprinkler system, but it provides added protection against water waste. It automatically shuts off the main water supply between watering cycles, helping limit leaks caused by faulty zone valves or damaged pipes.
How do I install an irrigation master valve?
To install an irrigation master valve, shut off the water supply, cut into the main irrigation line, and connect a compatible normally closed valve upstream of the zone valves. Wire the valve to the irrigation controller’s master valve terminal, restore the water supply, and test its operation for proper flow and leaks.
If you want to stay up-to-date on the latest Sprinkler Warehouse news and make the most of all of our one-of-a-kind promotions, join the Irri-Gator community today. Happy watering, Irri-Gators!