


Irrigation Solenoid Replacement Guide
Replacing a sprinkler solenoid can restore a sprinkler zone that will not turn on or shut off properly. The solenoid is the electrical part of an irrigation valve that controls water flow when your sprinkler controller sends a signal. Fortunately, you can often replace a faulty solenoid without removing the entire valve or cutting into your irrigation pipes.
Before starting an irrigation solenoid replacement, check the wiring and clean the valve to rule out other problems. If the solenoid is faulty, you can usually replace it with a compatible part using a few basic tools.
Table of Contents
How to Replace a Sprinkler Solenoid in 9 Steps
Replacing a sprinkler solenoid involves identifying the problem, shutting off the water and power, removing the old solenoid, and installing a compatible replacement. Follow these steps to complete the repair and test your sprinkler system.
1: Check the Sprinkler Solenoid and Wiring
A sprinkler zone that fails to turn on does not necessarily have a bad solenoid. Check the electrical connections and valve operation before buying replacement parts.
- Inspect the Wiring: Look for loose connections, damaged insulation, corrosion, or wires that have pulled away from the solenoid. Use waterproof, grease-filled wire connectors designed for irrigation systems to protect connections from moisture.
- Check the Controller: Make sure the sprinkler controller is powered on and programmed to run the affected zone. If other zones work normally, the problem may be isolated to the zone wiring, solenoid, or valve.
- Test the Solenoid: If you have a multimeter, check the solenoid’s resistance according to the manufacturer’s instructions. An open circuit or a reading outside the specified range can indicate a failed coil, although wiring faults and controller problems can produce similar symptoms.
- Check Manual Operation: Some valves have a bleed screw or a solenoid that can be loosened to open the valve manually. If the valve opens manually but not through the controller, investigate the electrical components before replacing the entire valve.
2: Gather the Tools and Replacement Parts
Having the right parts ready makes replacing a sprinkler solenoid easier and helps prevent unnecessary trips to the hardware store. You generally need only a few basic tools for this repair.
- Compatible Solenoid: Find a replacement that matches your valve manufacturer’s specifications, model, and solenoid type. Some solenoids look similar but have different threads, electrical ratings, or mounting arrangements.
- Basic Tools: Keep pliers, a screwdriver, and a clean cloth nearby if your valve requires them. Many solenoids can be removed by hand, so avoid using tools that could damage the valve or its fittings.
- Waterproof Wire Connectors: Have irrigation-rated, grease-filled connectors available if you need to reconnect the electrical wires. Standard wire nuts are not suitable for exposed underground irrigation connections because moisture can damage them.
- Multimeter: A multimeter is useful for checking electrical continuity and resistance before and after the replacement. Follow the solenoid manufacturer’s specifications when interpreting your readings.
3: Turn Off the Water and Power
Before removing the solenoid, shut down the irrigation system to prevent accidental operation and reduce the risk of water escaping from the valve. Even though solenoid replacement usually does not require opening the valve body, taking these precautions helps protect you and your equipment.
- Turn Off the Controller: Switch off the irrigation controller or disconnect its power before handling the solenoid wiring. This prevents the valve from receiving an electrical signal while you work.
- Shut Off the Water Supply: Close the irrigation system’s water supply valve if practical, especially if the valve is leaking or you need to inspect its internal parts. If you are only replacing an external solenoid on a valve that remains closed, follow the valve manufacturer’s instructions to determine whether shutting off the water is necessary.
- Relieve Pressure When Needed: If you need to open the valve body or loosen a pressurized component, relieve the water pressure first. Loosening a solenoid can manually open some valves and release water, so never assume the valve is depressurized simply because the controller is off.
4: Locate the Solenoid on the Irrigation Valve
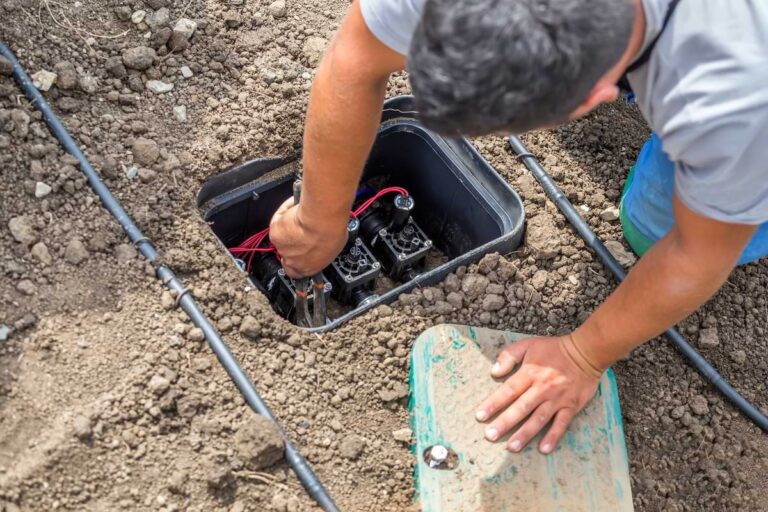
The solenoid is typically a small cylindrical component mounted on top of or beside the irrigation valve. It has two electrical wires and connects to the valve body through a threaded or manufacturer-specific fitting.
- Find the Correct Valve: Locate the valve that controls the malfunctioning sprinkler zone. Valve boxes are often buried near the area they serve, and multiple valves may be grouped together in a manifold.
- Identify the Solenoid: Look for the cylinder with two wires attached to it. Do not confuse it with the flow control knob or bleed screw, which may also sit on top of the valve.
- Clean the Work Area: Remove loose dirt, grass, and debris from around the valve before disconnecting anything. Keeping dirt out of the valve helps prevent blockages and additional problems after the repair.
5: Disconnect and Remove the Old Solenoid
Once you have located the correct component, disconnect its wiring and remove the solenoid from the valve. Take care not to damage the wires, valve body, or threaded connection.
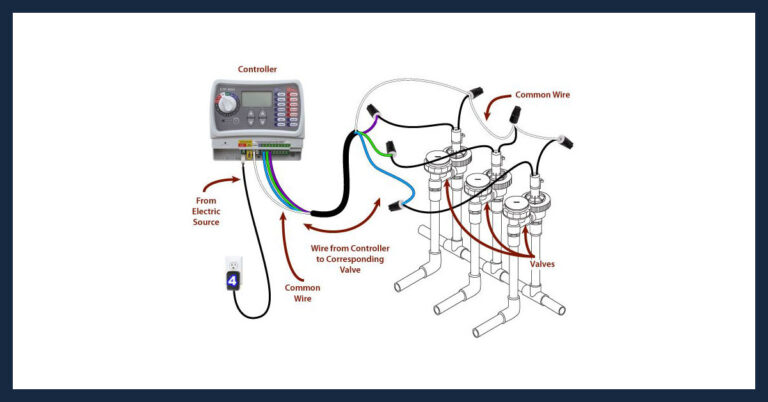
- Disconnect the Wires: Separate the solenoid wires from the irrigation system’s common and zone wires by removing the waterproof connectors. Photograph or label the connections if doing so will help you reconnect them correctly.
- Unscrew the Solenoid: Turn the solenoid counterclockwise if the manufacturer uses a standard threaded connection. If the component has a different locking or mounting mechanism, follow the manufacturer’s removal instructions instead of forcing it.
- Inspect the Valve: Check the solenoid mounting area for dirt, damaged threads, or other visible problems. If the valve body is cracked or the connection is damaged, replacing the solenoid alone may not fix the problem.
6: Install the Replacement Solenoid
Installing the new solenoid is usually the simplest part of an irrigation solenoid replacement. Make sure the replacement matches the original component and seats correctly in the valve.
- Compare the Parts: Check the new solenoid against the old one to confirm that the connections, dimensions, and electrical specifications match. If the replacement is not an exact match, verify compatibility with the valve manufacturer before proceeding.
- Thread It Into Place: Position the replacement solenoid and turn it clockwise by hand if it uses a threaded fitting. Tighten it according to the manufacturer’s instructions, and avoid overtightening, which can damage the threads or valve body.
- Reconnect the Wiring: Attach the solenoid leads to the appropriate common and zone wires using waterproof, grease-filled connectors. For most standard AC irrigation solenoids, the two leads are interchangeable, but confirm the wiring requirements for your particular model.
- Check the Installation: Make sure the solenoid is secure and the wire connections are protected against moisture. Do not apply thread sealant or other materials unless the manufacturer specifies that they are needed.

7: Restore Power and Test the Sprinkler Zone
After installing the replacement, restore the system’s power and water supply as appropriate. Run the affected zone manually through the controller and check that the valve opens and closes as expected.
- Check for Leaks: Inspect the valve and solenoid connection while the system is running. If you see water escaping around the solenoid, stop the test and check the installation for damage or improper seating.
- Confirm Water Flow: Verify that the sprinkler heads receive water when the zone activates. If the valve still does not open, check the wiring, controller output, water supply, and valve diaphragm.
- Confirm Automatic Shutoff: Allow the zone to finish its cycle or turn it off manually. The valve should close when the controller stops sending the signal, provided the valve’s mechanical components are functioning correctly.
8: Troubleshoot Any Remaining Problems
If the valve body is intact, you may be able to repair the problem by cleaning the valve or replacing its diaphragm. If the body is cracked or replacement parts are unavailable, replacing the entire valve may be the better option.
If the sprinkler zone still malfunctions after replacing the solenoid, another part of the valve or electrical system may be responsible. Check these common issues before replacing the entire valve.
| Problem | Possible Cause | What to Check |
| Zone Will Not Turn On | Wiring fault, faulty controller output, blocked valve, or defective solenoid | Check electrical connections, controller output, and valve operation. |
| Valve Will Not Close | Debris, damaged diaphragm, or manual bleed left open | Clean the valve and inspect the diaphragm and bleed mechanism. |
| Water Leaks Around the Solenoid | Loose, damaged, or incompatible connection | Check the threads, seals, and solenoid compatibility. |
| Zone Runs Weakly | Restricted water flow or partially opened valve | Check the water supply, diaphragm, and flow control setting. |
9: Decide Whether to Replace the Entire Sprinkler Valve
Replacing the solenoid is usually easier than replacing the entire valve because you can leave the valve body and connected pipes in place. However, a damaged valve or worn internal components may require a more extensive repair.
- Inspect the Valve Body: Replace the entire valve if the body is cracked, the connections are badly damaged, or compatible replacement parts are unavailable. If the body is intact, check whether replacing the diaphragm or other internal parts will restore proper operation.
- Check Replacement Options: Look for a manufacturer-approved repair kit if the valve has worn internal components. Replacing the solenoid and other faulty parts may be more practical than removing the entire valve.
- Follow the Flow Direction: If you install a new valve, make sure the arrow on its body points in the direction of water flow. Installing the valve backward can prevent it from opening or closing properly.
- Account for Pipe Connections: Threaded valves may be easier to remove than glued-in slip valves, which typically require cutting and reconnecting the piping. Leave enough room around replacement valves to make future repairs easier.
Irrigation Solenoid Replacement: Get Your Sprinkler System Working Again
Replacing a sprinkler solenoid is a straightforward repair when the valve body and other components are in good condition.
Check the wiring first, install a compatible replacement, and test the zone to confirm that the valve opens and closes properly. If the problem continues, inspect the diaphragm, valve passages, and controller before deciding whether the entire valve needs replacement.
FAQs for Irrigation Solenoid Replacement
How do I know if my irrigation solenoid is bad?
A faulty irrigation solenoid can prevent a sprinkler zone from turning on or cause the valve to operate inconsistently. Check the wiring and controller first, then use a multimeter to test the solenoid against the manufacturer’s electrical specifications.
Can you replace just the solenoid on a sprinkler valve?
Yes, most sprinkler valves allow you to replace the solenoid without removing the entire valve or cutting the irrigation pipes. Make sure the replacement solenoid is compatible with your valve, and follow the manufacturer’s instructions for disconnecting and installing it.
Are all irrigation solenoids the same?
No, irrigation solenoids vary by manufacturer, valve model, electrical specifications, and connection type. Check your existing solenoid’s specifications and the valve model to ensure you choose a compatible replacement.
If you want to stay up-to-date on the latest Sprinkler Warehouse news and make the most of all of our one-of-a-kind promotions, join the Irri-Gator community today. Happy watering, Irri-Gators!