


How to Install Sprinkler Valves in 8 Steps
Sprinkler valves control the flow of water to individual irrigation zones, allowing different areas of a yard to receive water according to their needs. Proper sprinkler valve installation helps maintain consistent water pressure, prevents leaks, and makes the system easier to operate and maintain.
Whether you’re installing anti-siphon valves above ground or in-line valves below ground, choosing the right location, connections, and valve size is important.
Table of Contents
How to Install Sprinkler Valves: 8 Steps for a Proper Installation
Installing sprinkler valves involves preparing the water supply, arranging valves into a manifold, and connecting each valve to its irrigation zone.
Follow these eight steps to install your valves correctly and leave room for future maintenance or system expansion.
1: Choose the Right Type of Sprinkler Valve
Start by determining which type of sprinkler valve your irrigation system requires. The two common options are anti-siphon valves and in-line valves, which differ in how they are installed and how they protect the water supply.
- Anti-Siphon Valves: Anti-siphon valves combine zone control with backflow prevention to help keep contaminated irrigation water from entering the potable water supply. They must be installed above ground, with the required clearance above the highest sprinkler head, and must meet local plumbing codes.
- In-Line Valves: In-line valves are installed underground and housed inside protective valve boxes. They control water flow to individual zones but require a separate, code-compliant backflow prevention device when one is required.
2: Check Local Backflow Prevention Requirements
Before installing sprinkler valves, determine what type of backflow prevention your irrigation system needs. Local plumbing codes, water utility requirements, and the layout of your property can affect which valve and backflow configurations are permitted.
- Code Requirements: Check with your local building department or water provider to determine whether an anti-siphon valve, pressure vacuum breaker, double-check assembly, or reduced-pressure assembly is required. Do not assume that an anti-siphon valve is an acceptable substitute for every type of backflow preventer.
- Installation Clearance: Account for required elevation, accessibility, and clearance around backflow equipment. Above-ground assemblies must remain accessible for inspection, testing, and maintenance.
3: Plan Your Sprinkler Valve Locations
Choose valve locations that provide convenient access to the water supply, irrigation piping, and electrical connections. Grouping valves by yard location or watering requirements can simplify installation and future troubleshooting.
- Zone Grouping: Organize valves into manifolds based on the areas, or irrigation zones, they control, such as separate groups for the front yard, backyard, and side yard. This keeps related irrigation zones together and reduces unnecessary pipe runs.
- Accessibility: Place valves where you can reach them without digging through landscaping or removing permanent structures. Use flags or marking stakes to identify planned valve locations before excavation.
- Future Expansion: Leave room for additional valves and connections when planning each manifold. Including one or two extra manifold outlets can make it easier to add irrigation zones later.
4: Determine the Correct Valve Size
Select valves based on the flow requirements of the zones they will control. The valve inlet size should accommodate the water supply without unnecessarily restricting flow.
These figures are general sizing guidelines rather than universal limits. Check the manufacturer’s flow and pressure specifications, along with the actual GPM requirements of your irrigation zones, before choosing a valve.
| Valve Inlet Size | General Flow Guideline |
| 3/4 inch | Under 10 GPM |
| 1 inch | Above 10 GPM |
5: Prepare the Installation Area
Once you’ve selected the valves and marked their locations, shut off the water supply and prepare the installation area. The excavation requirements depend on whether you’re installing above-ground anti-siphon valves or underground in-line valves.
- Anti-Siphon Excavation: Dig a trench or opening large enough to accommodate the inlet and outlet pipes, fittings, and required clearance around the valves. Keep the valve bodies above ground and accessible for inspection and adjustment.
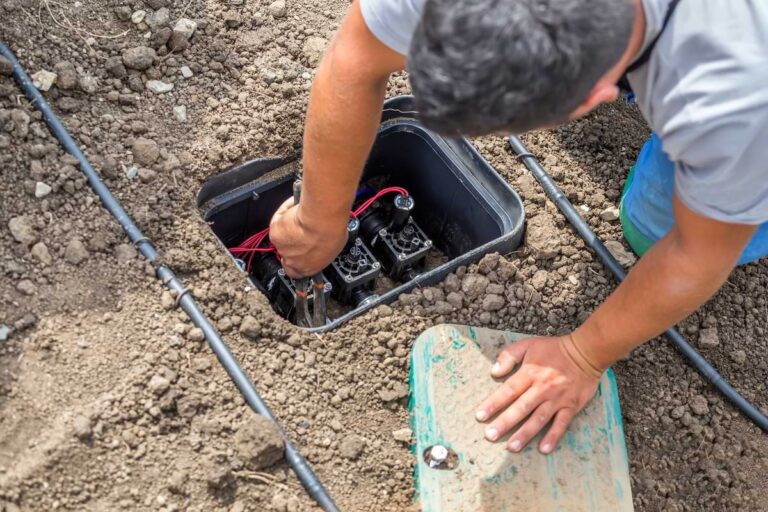
- In-Line Excavation: Dig a hole large enough for the valve manifold and protective valve box. Add several inches of gravel beneath the box to provide a stable base and help with drainage.
- Pipe Preparation: Cut the supply and zone pipes to the necessary lengths, removing burrs and debris before connecting fittings. Dry-fit the components first to confirm their alignment and spacing.
6: Assemble and Connect the Valve Manifold
A valve manifold is a group of sprinkler valves connected to a shared water supply. Assemble the manifold so each valve receives water from the main supply while controlling a separate irrigation zone.
- Manifold Connections: Connect the supply line to the manifold using compatible fittings, then install each valve according to its marked flow direction. Use the arrows on the valve body to identify the correct direction of water movement.
- Connection Compatibility: Match pipe materials, fitting sizes, and connection types to the valve manufacturer’s specifications. Use appropriate primer, solvent cement, thread sealant, or other approved connection methods for the materials being joined.
- Drip Irrigation Space: Leave enough room around drip irrigation valves for additional filtration and pressure regulation equipment. If possible, install the filter and pressure regulator before placing the valve assembly inside its box.
7: Install the Valves and Complete the Connections
Secure the assembled valves in their planned locations and connect the outlet of each valve to its corresponding irrigation zone. Keep the installation organized so individual valves, wires, and fittings remain accessible.
- Above-Ground Placement: Mount anti-siphon valves securely with the required clearance above the highest downstream sprinkler head. Keep the valves upright and avoid burying any part of the assembly that must remain exposed.
- Underground Placement: Position in-line valves inside the valve box, leaving enough room to access the valve bodies, wiring, and connections. Set the top of the box approximately level with the finished ground surface so the cover remains accessible.
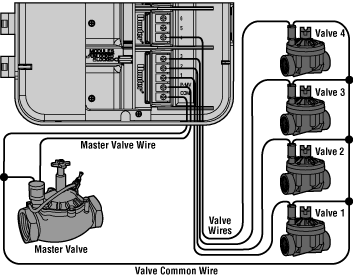
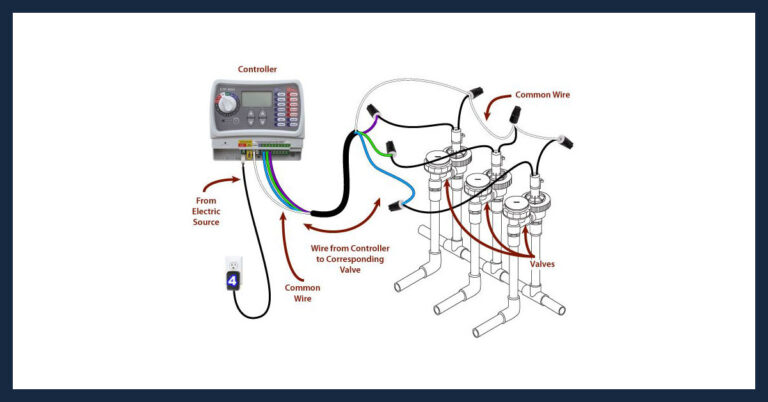
- Electrical Connections: Connect each automatic valve’s solenoid wires to the appropriate irrigation controller wires using waterproof wire connectors rated for direct burial. Label the zone connections to make future maintenance easier.
8: Test the Sprinkler Valves and Check for Leaks
Turn the water supply back on gradually and inspect the entire manifold before operating the irrigation system. Testing each valve individually helps confirm that the connections are secure and each zone receives water properly.
- Leak Inspection: Check the valve bodies, threaded connections, pipe joints, and manifold fittings for leaks. Tighten or repair problem connections before covering underground piping or completing the installation.
- Zone Operation: Activate each valve manually or through the irrigation controller to verify that it opens and closes correctly. Check that water reaches the intended sprinklers or drip irrigation lines without unexpected pressure drops.
- Flow Control: Adjust the valve’s flow control feature, if available, to regulate water delivery and help prevent excessive flow. Follow the manufacturer’s instructions to avoid restricting the zone more than necessary.
How to Install Sprinkler Valves for an Effective Irrigation System
Proper sprinkler valve installation starts with selecting compatible valves, planning accessible locations, and sizing each connection for the required water flow.
Take time to organize your manifolds, protect underground components with valve boxes, and test every zone before finishing the surrounding landscaping. Leaving extra room for maintenance and future connections can also save time when your irrigation system needs repairs or expansion.
FAQs for How to Install Sprinkler Valves
Is it easy to replace sprinkler valves?
Replacing a sprinkler valve is relatively straightforward if you have basic plumbing and wiring experience. Shut off the water supply, disconnect the old valve, and install a compatible replacement with the correct flow direction and pipe connections. Reconnect the solenoid wiring, restore the water supply, and test the valve for leaks and proper operation.
Can I install a sprinkler system myself?
Yes, you can install a sprinkler system yourself with proper planning, tools, and knowledge of irrigation plumbing. You’ll need to map out watering zones, calculate water pressure and flow rates, install pipes and sprinkler heads, connect control valves, and program an irrigation controller. Check local codes before starting, particularly for backflow prevention requirements.
What position should my sprinkler valves be in?
Most automatic sprinkler valves should be installed upright, with the solenoid and manual controls accessible for maintenance. Follow the manufacturer’s installation instructions, paying attention to the flow-direction arrow on the valve body, which should point toward the irrigation zone. Anti-siphon valves must also be installed above the highest sprinkler head, while in-line valves can be installed underground inside protective valve boxes.
If you want to stay up-to-date on the latest Sprinkler Warehouse news and make the most of all of our one-of-a-kind promotions, join the Irri-Gator community today. Happy watering, Irri-Gators!